


I have shown how Polka Dots can be make in any version of Photoshop. The tutorial is here. This tutorial will show how you can make Polka Dots with Patterns. Photoshop has a number of built in Patterns. You can also download free patterns from the internet and install them in Photoshop. You can find some here.

Step 1 : Open a New White Layer in Photoshop.

Step 2 : Click the New Layer icon and a new layer -- Layer 1 -- forms above the Background Layer.

Step 3 : Click the Elliptical Marquee Tool.

Step 4 : Press Shift and draw out a small circle approximately in the middle of the White layer.

Step 5 : Click on the paths pallete to open it, then click on the Make Workpath icon at the bottom (blue arrow).

Step 6 : As soon as you click the selection turns into a Path.

Step 7 : Click on the Pattern Stamp Tool.

Step 8 : Click the small square icon in the top right of the top panel (red arrow). It opens the Brush dialogue box. Click on Brush 19. It is a hard brush. Click on Brush Presets then just below it on Brush Tip Shape (Yellow arrow). Drag the Master Diameter at the bottom (purple arrow) till the brush separates into dots. I have set the Master Diameter at 20 pixels.

Step 9 : Click on top panel to reveal the Patterns dialogue box. Then click on the tiny black arrow at the right.

Step : 10 : You will be able to see all the Pattern presets available. I have some that have been downloaded from the internet. I will be using the Basic Elements which I have downloaded. The link to it is given at the beginning of the tutorial.

Step 11 : As soon as you click on a Pattern, this dialogue box appears. Click OK.

Step 12 : The patterns are replaced in the box at the top. I have clicked on a pattern.

Step 13 : Right click the Layer thumbnail of the Workpath and from the popup click on Stroke path.

Step 14 A Stroke Path popup appears. From the dropdown change the default setting of Brush to Pattern Stamp. Click OK.

Step 15 : As soon as you click OK, the path is stroked by the Pattern Stamp.

Step 16 : Click anywhere below the Workpath .

The Path disappears.

Step 17 : Click back on the Layers pallete. Click on the New Layer icon and a New Layer 2 forms over Layer 1.

Step 18 : Click the Elliptical Marquee Tool.

Step 19 : Press Shift and draw out a larger perfect circle. You do not have to bother that it is not at the centre.

Step 20 : Switch back to the Paths pallete and click on the Make Workpath icon.

The selection changes to a Workpath.

Step 21 : Click the Foreground Color.

Step 22 : As soon as you click the Color Picker appears. The column of color in the middle is called the Spectrum. Note that there is a tine white slider at the bottom. You can move it up or down to change the color in the left panel. I have clicked on a shade of red. Its numerical value is given in the box at the bottom -- 'ea0e0e'. Click OK.

You will find that the Foreground Color immediately changes to the color picked.

Step 23 : Click on the Pattern Stamp Tool.

Step 24 : Look at the top panel where the arrow points to. You can increase the size of the Brush tip by pressing ] (right bracker key next to the letter P on your keyboard). You can decrease the size by pressing [ (left bracket key). This is a very useful shortcut to know.

Step 25 : Click on the Paths pallette. Right click the Workpath and click on Stroke Path.

Step 26 : In the top panel I am selecting another Pattern by first clicking on the Pattern Stamp in the left panel and then in the top panel.

Step 27 : After you right click the Workpath this dialogue pops up. Make sure that Pattern Stamp is selected.

The workpath is filled with the pattern. Click blow the workpath in the Paths pallete as in Step 16 to make the path go away.

Step 28 : Click back on the layers pallette and click on the New layer icon. A new Layer 3 forms above Layer 2.

Step 29 : Click the Pattern Stamp Tool. In the top from the drop down click on the small black arrow to reveal the list of Patterns. I am clicking on Nature Patterns which you will find in Photoshop.

Step 30 : This dialogue box pops up. Click OK.

Step 31 : I am now clicking on one of the presets of Nature Patterns.

Step 32 : Click on the Rectangular Marquee.

Step 33 : Press Shift and you will be able to draw out a perfect square.

Step 34 : Click on the Paths pallete and click on Make Workpath icon.

Click on the Pattern Stamp.

Step 35 : In the Paths pallette, right click the thumbnail of the workpath and click on Stroke Path.

Step 36 : This dialogue box pops up. Click OK.

Step 37 : The Pattern is applied.

Step 38 : Click on the Layer pallette. Click on the Add New Layer icon and a new layer 4 forms.

Step 39 : Click on the Elliptical Marquee Tool.

Step 40 : Press Shift and draw a perfect circle.

Step 41 : Click on the Paths pallete. Click on Make Workpath from Selection.

Step 42 : Click on the Brush Tool. we have been using Patterns, let us try the Brush Tool.

Step 43 : Click the icon in the top panel to reveal the Brushes pallete. Click on the small double arrow to close the Brush pallette.

Step 44 : In the Paths pallette right click the layer thumbnail of the workpath and click on Stroke Path.

Step 45 : The Stroke Path dialogue box pops up. Make sure that Brush is selected. Click OK.

The Brush is applied. Note I had earlier in Step 21 changed the Foreground Color to Red. Click below the workpath to make the path go away.

Step 46 : Click back on the Layers pallette. Note you are on Layer 4 which is highlighted.


Step 47 : Press CTRL+A. This will select the entire canvas. Click on the Move Tool.

Step 48 : In the top panel you will find these five icons. Click on the second and fifth.

Step 49 : Now click on Layer 3 and follow exactly the same steps as in 47 and 48. Do the same for Layer 2 and Layer 1.

By following steps 47 and 48 in each layer in turn aligns the dots. They are now exactly in the centre of the canvas.

Step 50 : Layer 1 is the last layer I worked on, therefore it is highlighted.

Step 51 : Press Shift and click on Layer 4 which is the topmost layer. All the layers are highlighted.

Step 52 : Press CTRL+E. All the layers are merged into Layer 4.\

Step 53 : Go to Filter>Distort>Spherize.

Step 54 : The Spherize dialogue box opens. Drag the Amount slider from 100 % to 60 %. Nohing hard and fast about it though. Click Ok.
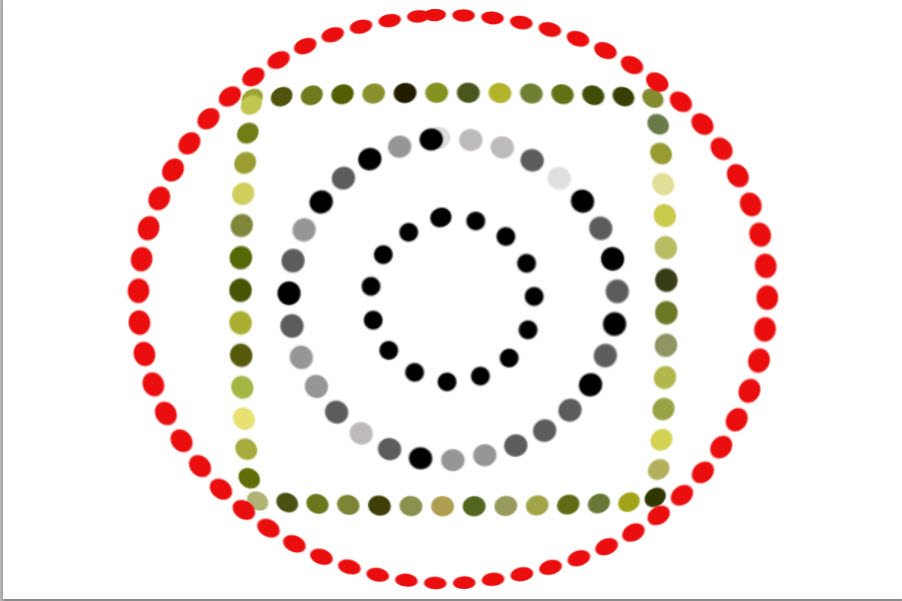
Step 55 : The Spherize filter has been applied.

Step 56 : In the Layers pallete click on Add Layer Styles and from the popup click on Bevel and Emboss.

Step 57 : When the Bevel and Emboss dialogue opens first change the Technique to Chisel hard.

Step 58 : Check Anti-alias. Click the Gloss Counter and from the dropdown click on Ringe double. It is the one the red arrow points to.

Step 59 : Next Increasethe to 10 pixel and decrease the Depth to 75 %. Do not click OK.

This is how the Polka Dots looks after applying Bevel and Emboss.

Step 60 : Click on Drop Shadow. Now click ok.

Step 61 : Right click the Drop Shadow and from the popup click on Create Layer.

Step 62 : This dialogue box pops up. Click OK.

Step 63 : Look in the layers pallete. You will find a layer called Layer 4's Drop shadow. Click to select it.

Step 64 : Press CTRL+T. A selection appears.

Step 65 : Keeping CTRL+T pressed drag the middle handle down as shown. Press Enter to apply the transformation.

Step 66 : Drag the Opacity of the layer down to 50 %.

Step 67 : Click on the Add layer Mask and a Layer Mask forms next to the layer thumbnail on Layer 4's drop shadow.

Step 68 : Click the Gradient Tool.

Step 69 : Click in the top panel where the arrow points to, to reveal the Gradient editor.

Step 70 : Click the Gradient shown by the arrow. It's called Foreground to Transparent.

Step 71 : Drag from just above the drop shadow till the bottom keeping Shift pressed.

The drop shadow is blurred out at the top by the Layer Mask. And, here is the finished image.
Other photoshop tutorials are here.


