


Creating an alien from an image can be quite fascinating. You can let your imagination run wild. But first you need a suitable image. You will also need to use the Pen Tool and the Liquify Tool. It is not difficult to use once you know how to go about it. Read up here on the Pen Tool.

Step 1 : I am selecting my image from the Bridge.
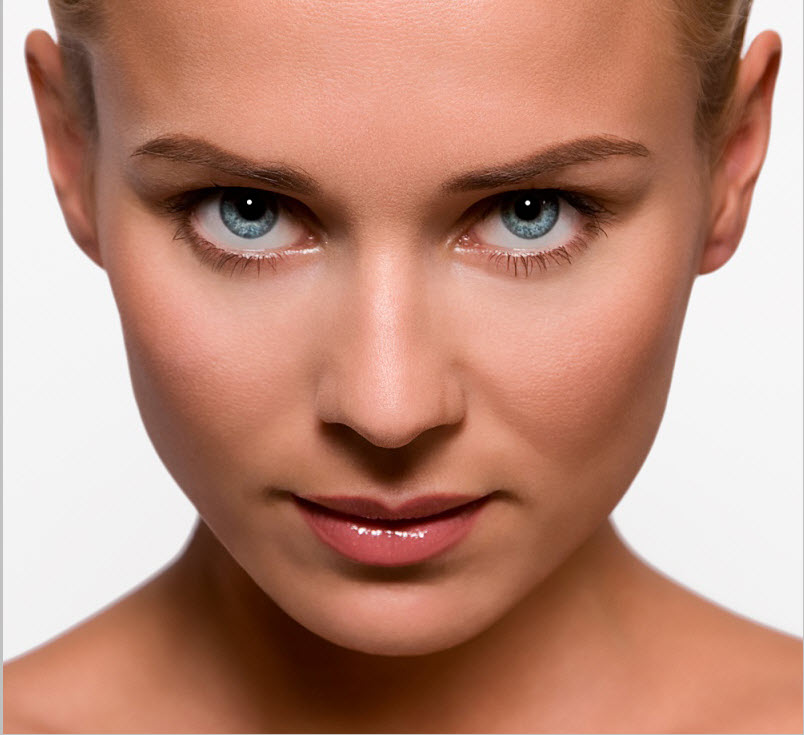
This is the actual image. I prefer this because it has a white background, but one with a background will also do. This is a free stock image. You will find it here
It belongs to ~Blair-W Live, Laugh, Love

Step 2 : Press CTRL+J to duplicate the Background layer.

Step 3 : Go to Filter>Liquify.

Step 4 : The Liquify Filter dialogue opens filling your screen.

Step 5 : The tools in Liquify are on the left side. I will explain those that we need here.

Step 6 : On the right you will find the controls. We will basically need the Brush Size and Brush Density.

Step 7 : The Brush Density can be left at 50. The size of the Brush can be increased by pressing ] (right bracket) and decreased by pressing [ (left bracket).

Step 8 : By default the Forward warp Tool is selected.

Step 9 : I have made the Brush quite big.

Step 10 : I have placed the Brush on the tip of the nose. I am going to push the nose in.

Step 11 : By using the Brush very slowly and with small sweeps of the hand I have tucked in the nose.

Step 12 : By tucking and pulling on both the left and right side of the nose I have made it squat and thick.

Step 13 : Click on the Bloat Tool.

Step 14 : With the Bloat Tool selected centre the brush over the eye. You can see that I have made the Brush even bigger by pressing the ] (right bracket) key.

Step 15 : Click, but don't hold and the eye will grow bigger.

Step 16 : Click on the other eye. Again don't hold. Click a number of times. Both eyes should look similar.

Step 17 : Click back on the Forward Warp Tool.

Step 18 : Tuck in the cheeks to make the face look elongated. Draw up the arch of the eyebrows gently. It will make the eyes rounder. Pull the upper lip up gently. Do likewise with the lower lip.

Step 19 : Click OK and have a look at the image.

This is how my image looks.

Step 20 : Double click where the hand points to in the Layer. You will be able to give the layer a name. I have typed in First Liquify. You can give any name that you want.

Step 21 : Press CTRL+J. The First Liquify Layer is duplicated into the First Liquify copy.

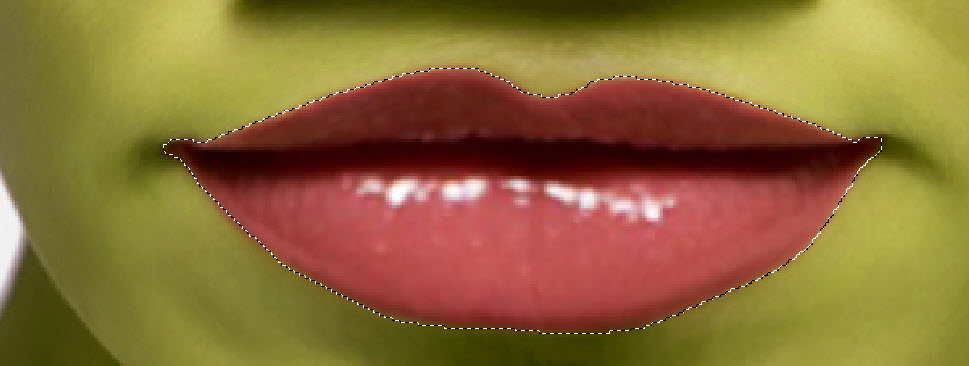
Step 22 : Go to Filter>Liquify.

Step 23 : I have drawn out the lips.

Step 24 : Click OK.

This is how the image looks.

Step 25 : Rename the First Liquify copy layer to Lips.

Step 26 : Duplicate the Lips layer. A Lips copy layer forms.

Step 27 : Rename the Lips copy layer to Ears.

Step 28 : Go to Liquify. use the Forward Warp tool to pull down the ears. Then pull it out. You should only use short, gentle strokes. Do not be in a hurry.

Step 29 : Click OK in the Liquify dialogue box.

This is how the image looks.

Step 30 : Click the Pen Tool. If you don't know how to use the Pen Tool use the Magnetic Lasso instead. You should press SHIFT while adding to the selection for selecting the eyes and lips after going around the outline with the Magnetic Lasso should you use it.

Step 31 : Select the outline of the face. Leave out the eyes and lips. I suggest you zoom into the image before you begin working with the Pen Tool. It will enable you to make an accurate selection.

Step 32 : Press CTRL+J. The selection will be copied on Layer 1.

Step 33 : Change the name of Layer 1 to Skin.

Step 34 : CTRL+CLICK the layer thumbnail renamed Skin.

Step 35 : The selection of marching ants reappear.

Step 36 : Click Create Fill Adjustment layer button. Click on Hue/Saturation from the pop up menu.

Step 37 : The Hue/Saturation dialogue box opens.

Step 38 : Drag the Hue, Saturation and Lightness sliders in that order. First determine the color you want.

This is how my image looks.

Step 39 : Click on the Ears layer.

Step 40 : Zoom into the image and select the pupils of the eyes with the Pen Tool.

Step 41 : Turn the Paths into Selections.

Step 42 : Click on the Eyedropper Tool.

Step 43 : Click anywhere on the green skin.

Step 44 : The Foreground Color has changed into the color I clicked. Click the Foreground Color.

Step 45 : The Color Picker opens.

Step 46 : Click on a darker shade in the left pane. Click OK. Note that the 'new' at the top shows the color just picked.

Step 47 : Click the New Layer button and a new Layer 1 forms above the Ears layer. We were on this layer.

Step 48 : Press ALT+BACKSPACE. This will fill with the Foreground Color. It is the color just chosen.

Step 49 : Lower the Opacity of Layer1 by dragging the Opacity slider to the left. How much you will drag will depend on the effect you want.

Step 50 : Press CTRL+D to deselect. This is how the eyes look.

Step 51 : Again click on the Ears layer to select it.

Step 52 : Select the whites of the eyes with the Pen Tool. Turn it into a selection.

Step 53 : Return to the Layers palette and press CTRL+J. The selection is copied and pasted onto Layer2.

Step 54 : CTRL+Click on Layer2.

Step 55 : The selection of marching ants around the whites of the eyes reappear.

Step 56 : Click the Foreground Color. This will bring up the Color Picker.

Step 57 : Now click on a lighter shade. Note the 'new' at the top will change to the color picked.
Click OK in the Color Picker.

The Foreground Color changes to the color picked.

Step 58 : Press ALT+BACKSPACE to fill with the Foreground Color, which we have just chosen.

Step 59 : Lower the Opacity of the Layer by dragging the slider.

My image looks like this.

Step 60 : Again click on the ears layer.

Step 61 : Select the lips with the Pen Tool.

Step 62 : In the Layers palette, press CTRL+J. The selection of the lips will be copied and pasted onto Layer 3 above the ears layer.

Step 63 : CTRL+Click on the layer thumbnail of Layer 3.
Step 64 : The lips are again selected.

Step 65 : Click on the Foreground Color. It shows the last color selected. As soon as you click the Color Picker opens.

Step 66 : Click on a darker shade. Click OK in the Color Picker.

Step 67 : Press CTRL+BACKSPACE. The lips fill with the Foreground Color. This is color just picked.

Step 68 : Lower the opacity of the layer suitably.

This is how the image looks.

Step 69 : Click on the Skin layer. CTRL+CLICK on the layer thumbnail.

Step 70 : The skin is selected again.

Step 71 : Click on the New Layer button and a new layer 4 forms above the Skin layer.

Step 72 : Click on the Gradient Tool.

Step 73 : Drag diagonally with the Gradient Tool.

This is how the image looks.

Step 74 : Drag the opacity of the layer to 50% or so.

This is how the image looks.

Step 75 : Go to Filter>Render>Difference Clouds

This is how the image looks after adding Render Difference Clouds.

Step 76. Go to Filter>Noise>Add Noise

Step 77 : The Add Noise dialogue box opens. First set the Distribution to Gaussian and check the Monochromatic. Now drag the Amount. Look at your image as you drag. Click OK when satisfied.

Step 78 : Press CTRL+D to deselect. This is how the image looks.

Step 79 : Click on the topmost layer. Click on the New Layer button. A new Layer 5 forms at the very top.

Step 80 : Press X and then D on the keyboard to restore the Foreground Color to Black and Background to White.

Step 81 : Press X on the keyboard to change the Foreground to White.

Step 82 : Press b on the keyboard. It is the shortcut for Brush. Make the Brush size smaller with the [ (left bracket) key.

Step 83 : Draw stripes with the Brush like this.

Step 84 : Decrease the opacity of the layer.

Step 85 : This is how the image looks.

Step 86 : I have opened another image which I will use as a background. Drag it over to the alien's image.

Step 87 : The background image covers the alien's image. It is on the topmost layer of the Layers palette.

Step 88 : Press ALT and click on the Add Layer Mask button. A Black Layer Mask appears beside the layer thumbnail on Layer 6.

Step 89 : The alien's image reappears.

Step 90 : Zoom into the image.

Step 91 : Set the Foreground Color to White. Press b for the Brush Tool.

Step 92 : Begin painting with white and the Background image will be revealed. If you make a mistake press x to change the Foreground Color to Black and paint away the mistake. Then resume painting with White.

Step 93 : Paint away and the background will gradually become visible.

Step 94 : Click the New Fill or Adjustment Layer and click on Levels after you have finished with the background.

Step 95 : When the Levels dialogue box appears, drag the middle slider towards the right. The image will gradually darken. Click OK when satisfied.

The finished Alien.
Other photoshop tutorials are here


