


The tone of an image may not be what you want to be like. Or you may deliberately want a certain effect that you have not captured with your camera. Photoshop can help achieve the tone you want. This is particularly true when dealing with images of models.

Step 1 : I have opened this image in Photoshop. You will find it here
It belongs to *Tigg-stock Dealers in chill and inspiration

Step 2 : Press CTRL+J to duplicate the Background Layer. A new Layer 1 forms.

Step 3 : Press CTRL+SHIFT+U to saturate the image.

Step 4 : Lower Opacity to 40%.

Step 5 : This is how the image looks after lowering the Opacity of Layer1.

Step 6 : Press CTRL+J. Layer duplicates into Layer 1 copy.
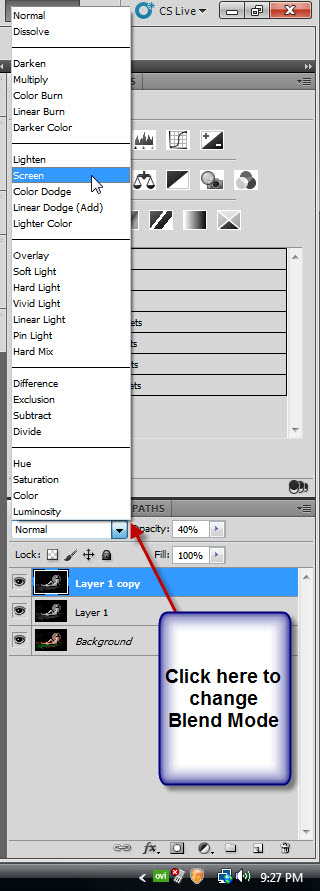
Step 7 : Change the Blend Mode to Screen.

Step 8 : Increase the Opacity to 80% from 40%.

This is how the image looks.

Step 9 : Click the Add New Fill or Adjustment button and click on Levels.

Step 10 : When the Levels dialogue box opens drag the lower white slider shown with the arrow slightly to wards the left. It ill darken the image slightly.

Step 11 : Click on the New Fill or Adjustment Layer button and click on Solid Color.

Step 12 : The Pick a Solid Color dialogue box opens. It works in the same way as the Color Picker. In case you have not used the Color Picker before, the column of color in the middle is called the Spectrum. You can see a tiny white slider at the bottom. To change the color at the left drag the slider up or down.

Step 13 : I have dragged the slider up a bit to select the color. Then clicked on a shade of the color in the left box. The numerical value of the color appears at the bottom. Click OK.

Step 14 : Lower the Opacity of the Layer to 25% (nothing hard and fast about it though). Change the Blend Mode to Color.

And here is the image. You can set the color you like for the effect you want.

This is an additional step in case you want it.
Step 15 : Click the Add New Fill or Adjustment layer button and click on Gradient Map.

Step 16 : The Gradient comes up. Click where the arrow points.

Step 17 : When you click, it opens the Gradient Editor. I have some extra Gradients that I have download.
The ones you have will do just as well. The Presets are the Gradients you have.

Step 18 : I am clicking on the Blue, Red, Yellow Preset. All Gradients have a name. Hover your cursor to see the names. Click OK after choosing your Gradient.

Step 19 : Change the Blend Mode to Color as shown earlier. Lower the Opacity suitably. I am satisfied with 50% for this image.

And here is my image.

Step 20 : If I were to click on Violet, Green, Orange

This is the effect I get.

Step 21 : If I were to click on Chrome

This is the effect I get. The three Presets shown here are found in all versions of photoshop. Have fun.
Other photoshop tutorials are here


