


I have been asked to show how the image of a model (or anything) can be pasted into a silhouette in Photoshop. It should not be difficult. We need some brushes and a free stock photo. This will save time. If you want to make a perfect silhouette from an image, say a model please see here

I will be using this free Brush Set. It has been made by *Chris10
Download the brush here
You will have to register to download the Brush. Registration is free as also the Brush. You have to install the Brush in Photoshop. If you do not know how to install a Brush, please see my tutorial here

Step 1 : Open a new white layer in Photoshop.
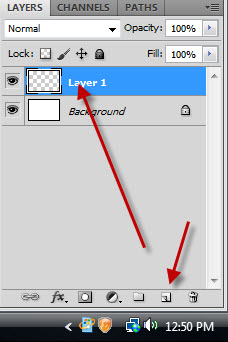
Step 2 : Click the New Layer button and a new Layer 1 forms over the Background Layer. You should use each Brush on a separate layer. This is because, should you not like a particular brush or effect, you can just delete the layer and the rest of your composition stays intact.

Step 3 : Press b on the keyboard to bring up the Brush Tool. Click in the top panel for the Brush settings. Scroll down to the selected Brush and click.

Step 4 : This dialogue Brush opens. Click OK.

Step 5 : The Brushes have been loaded.

Step 6 : I have clicked on a Brush. You can use any Brush you like.

Step 7 : The Brush as you can see is quite large. To decrease the size of a Brush press [ (left bracket), to increase the size press ] (right bracket).

Step 8 : Before using the Brush Go to Image>Image Rotation>90 degree CW.

Step 9 : The canvas has been rotated.

Step 10 : Make sure that the Foreground/Background colors are set the default Black/White. If it is not press x and then d on the keyboard.

Step 11 : Now click once with the Brush.

This is how the image looks.

This is how the Layers palette looks like. The Brush is on Layer1 above the White Background layer.

Step 12 : CTRL+CLICK the layer 1 thumbnail.

Step 13 : As soon as you CTRL+CLICK a selection of marching ants select the silhouette.

Step 14 : I have now opened this free stock image. You will find it here
It belongs to ~Greeneagle777
Press CTRL+A (Select All) then CTRL+C (COPY) A selection of marching ants surrounds the image.

Step 15 : Click back on the silhouette. Go to Edit>Paste Special>Paste Into (in Photoshop CS5). In earlier versions you will find the paste into command directly under Edit.

Step 16 : After Pasting Into. Press CTRL+T. The image that I have pasted into is a huge one. Pressing CTRL+T brings up a selection.

Step 17 : Press SHIFT+ALT and drag the top left corner handle up and down diagonally. The image will be resized proportionately.

Step 18 : Keeping SHIFT+ALT pressed drag the right, bottom and top middle corner handles to resize suitably. Press ENTER after resizing.

This is how the image looks.

Step 19 : Click on Layer 1.

Step 20 : Click on Layer Styles button. Click on Drop Shadow.

Step 21 : Keeping the layer Styles dialogue box open with the Drop Shadow selected, place the cursor on the image. You will be able to move the Drop Shadow anywhere you want.

Step 22 : In the Drop Shadow Controls, the Distance has already been set by dragging with the cursor. I have increased the Size to 10, Spread to 3 and lastly reduced the Opacity to 30%. There is nothing hard and fast about it. It will depend on your image and your liking. Click OK.

This is how the image looks.

Step 23 : Press CTRL+CLICK the new layer icon. A new Layer 3 forms under Layer 1.


Step 30 : In the Lighting dialogue box controls, set the Style at the top to Three Down.

This is the Three Down.
 Step 31 : At left pull up the lights one by one by dragging on the arrows.
 Step 32 : This is how the lights should looks.
 Step 33 : Change the Light Type to Omni.
 The Preview in the dialogue box looks like this. Click OK.
 Step 34 : Go to Edit>Fade Lighting Effects
 Step 35 : In the Fade dialogue box lower the Opacity to 60% and change the Mode to Multiply. Click OK.
 This is how the image looks.
 Step 36 : Go to Filter>Distort>Polar Coordinates.
 Step 37 : The Polar Coordinates dialogue box opens. The Rectangular to Polar is checked by default.
Click OK.
 The finished image.
Other photoshop tutorials are here

Click OK.
Other photoshop tutorials are here


