


This is a tutorial on light shaping. After a shoot in the studio, the lights can be 'shaped' further in Photoshop. I will also provide some tips on beautifying the overall image. Some of these steps takes hours, if not a day.

I will be using this free stock image. You will find it here

This particular image is not of high resolution as can be seen in the Image size dialogue box.

I am therefore changing the resolution to 300 pixels/inch from 72 in the original image. The Width, Height and other parameters also change. I am also setting 'Bicubic Smoother (best for enlargement) and clicking OK.

The image is bigger now.
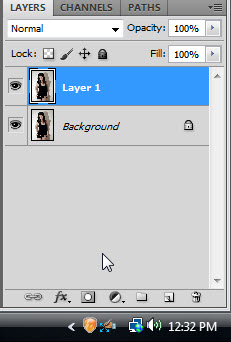
Step 1 : Press CTRL+J to duplicate the background Layer into Layer 1.

Step 2 : Zoom into the image to see the highlights and shadows in the image.

Step 3 : Press CTRL+SHIFT+N to make a new layer. Change the Mode to Overlay.

Step 4 : with the Mode set to Overlay, check the Fill with Overlay-neutral color (50% gray).
Click OK.

Step 5 : Layer2 filled with 50% gray forms.

Step 6 : Click the Brush Tool.

Step 7 : In the top panel the Mode is set to Normal. I have lowered the Opacity to 9%. You need a very low Opacity for this.

Step 8 : The Foreground/Background is set to Black/white which is the default. You can press x on the keyboard to change the Foreground Color.

Step 9 : Paint on the highlights of the image. You can increase the size of the brush by pressing the [ (left square bracket) and increase it by pressing ] (right square bracket).

Step 10 : I am now painting on the forehead highlights.

Step 11 : I am now painting on the highlights on the neck and chest.

Step 12 : I am painting the highlights on the cheeks with White.

Step 13 : I am painting the highlights over the eyes.

Step 14 : Press x on the keyboard to change the Foreground Color to Black to paint the shadows.

Step 15 : I have darkened he shadow on the right side side of the cheek and below the chin by painting with Black.

Step 16 : I have darkened the right side of the nose. Also below the eye.

Step 17 : Press ALT and click on the eye icon on the Background layer to see the before and after effect.

This is the before.

This is the after.

Step 18 : Press CTRL+SHIFT+ALT+E to make a composite Layer3.

Step 19 : I have zoomed onto the left eyebrow. It is not very perfect.

Step 20 : Click the Clone Stamp tool.

Step 21 : The Opacity is set to 50% in the top panel and Mode to Normal and Flow to 100%.

Step 22 : Change the Opacity to 100%.
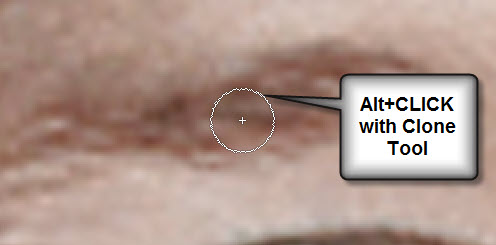
Step 23 : ALT+CLICK with the Clone Stamp on the eyebrow.

Step 24 : ALT+CLICK to slowly build up the eyebrow.

Step 25 : Do the same with the other eyebrow.

Step 26 : Press CTRL+SHIFT+ALT+E to make another composite Layer4.
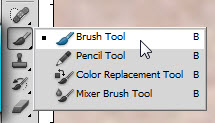
Step 27 : Click the Brush Tool.

Step 28 : In the top panel the Mode is set to normal and Opacity to 20 %.

Step 29 : Zoom into the the eye. ALT+CLICK on the white of the eye and begin painting.

The eyes have been whitened.

Step 30 : Do the same to the other eye.

Step 31 : Press x and then d on the keyboard to reset the Foreground/background Colors to the default.

Step 32 : Press CTRL+J. Layer 4 copy forms.

Step 33 : Click the Elliptical Marquee Tool.

Step 34 : Place the cursor in the middle. Press ALT and drag outwards to increase the selection to encompass the eye.

Step 35 : Move the selection to place it more accurately over the eye.

Step 36 : Click the New Fill or Adjustment Layer button. Click on Curves.

Step 37 : The Curves 1 layer forms.

Step 38 : Click in the middle of the diagonal and drag a trifle up gently.

The eyes lighten.

Step 39 : Press CTRL+SHIFT+ALT+E to form a composite layer 5.

Step 40 : Follow the same process to lighten the other eye.

Step 41 : You have to draw with the Elliptical marquee and then use a Curves Adjustment layer (Curves 2).

Step 42 : Press CTRL+SHIFT+ALT+E. A composite Layer 6 forms.

This is the image we started off with.

This is how the image looks so far.

Step 43 : Zooming into the image reveals some blemishes which have to be removed.

Step 44 : Click the Healing Brush Tool.

Step 45 : Reduce the size of the Healing Brush to just a little bigger than the blemish.

Step 46 : Position the Healing Brush over the blemish. You can see a preview inside the circle on how it will look after healing. The preview shows that the blemish will be removed. Click with the Healing Brush to remove the blemish.

Step 47 : The blemish on the nose has been removed. Use the Healing Brush on other blemishes in just a similar way. You need to zoom in to see the blemishes.

Step 48 : Press CTRL+SHIFT+ALT+E to make a composite Layer 7.

Step 49 : With layer 7 highlighted, press SHIFT and click on Layer1. All the layers are highlighted.
Press CTRL+E to merge down.

Step 50 : All the layers merge into Layer 7.

Step 51 : Click the Quick Mask button.

Step 52 : Click the Brush Tool.

Step 53 : In the top panel the Mode should be set to normal, Opacity to 100% and Flow to 100%.

Step 54 : Set the Hardness of the Brush to 45% or so.

Step 55 : Zoom into the image and just paint the skin are with the Quick Mask. Vary the size of the Brush as you paint.

Step 56 : I have selected the entire skin with the Quick Mask.

Step 57 : Click the Quick Mask button again. (In CS4 and earlier there will be two buttons).

Step 58 : As soon as you click the Quick mask button a selection of marching ants forms.

Step 59 : Press CTRL+SHIFT+I to inverse the selection.

Step 60 : Press CTRL+J. The selection (skin) is copied and pasted on Layer 8.

Step 61 : Zoom into the image. Since this is not a high resolution image, the skin appears blotchy.

Step 62 : Go to Filter>Noise>Dust & Scratches.

Step 63 : Set a small Radius and increase the Threshold.
I have set a radius of 6 and Threshold of 18. Click OK.

The skin has smoothened.

Step 64 : Right click the layer and click on Merge Down.
 The finished image.
Other Photoshop tutorials are here


