This is about creating a Weave Effect with any image in photoshop, It is quite easy to do. The image will look as if it has been woven on strips.
Step 5 : Press AT+BACKSPACE to fill with the Foreground Color which is Black in this case.
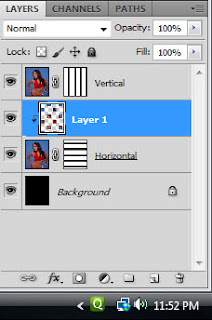
Step 6 : Double click on Layer 1 copy and rename it Vertical.
Step 7 : Double click on layer 1 and rename it Horizontal.
Step 8 : Click off the eye icon in the Vertical Layer
Step 9 : Go to Edit>Preferences>Guides, Grid & Slices.
Step 10 : Give these settings.
Step 11 : Click OK.
Step 12 Go to View>Show>Grid.
Step 13 : The image looks like this with the Grids
Step 14 : Click the Rectangular Marquee Tool.
Step 15 : Go to View>Snap To>Grid.
Step 16 : Draw out a selection with the Rectangular Marquee. Note I have drawn the first selection so that it includes the model's eyes.
Step 17 : In the top panel click on the Add to Selection icon.
Step 18 : Draw out the remaining selections.
Step 19 : The Horizontal Layer should be selected.
Step 20 : Click the Layer Mask button. A Layer Mask forms next to the layer thumbnail on Horizontal Layer.
Step 21 : Press CTRL+H to hide the Grid temporarily.
Step 22 : Click on the Vertical Layer. Turn on the eye icon of the layer.
Step 23 : Click the Rectangular Marquee Tool.
Step 24 : Press CTRL+H to turn the Grid back on.
Step 25 : In the top panel the Add to selection icon should be selected.
Step 26 : Draw out the vertical selections with the Rectangular Marquee.
Step 27 : Click the Layer Mask button. A Layer mask forms next to the layer thumbnail on Vertical Layer.
Step 28 : Press CTRL+H to hide the Grid. The Horizontal and Vertical strips are now created.
Step 29 : With the Vertical Layer highlighted, CTRL+CLICK on the Horizontal Layer Mask.
Step 30 : The image looks like this.
Step 31 : Press CTRL+SHIFT+ALT and click on the Layer Mask of Vertical Layer.
Step 32 : The image looks like this.
Step 33 : Go to Select>Save Selection.
Step 34 : In the Save Selection dialogue box I have named the selection as squares. By default New Channel is selected. Click OK.
Step 35 : In the top panel select Subtract from selection.
Step 36 : Drag out over the top left square.
Step 37 : It disappears.
Step 38 : Drag out the next alternate square.
Step 39 : The square disappears. You should deselect all the alternative squares similarly.
Step 40 : The alternative squares have been removed.
Step 41 : Click on the Horizontal Layer.
Step 42 : Press CTRL+J. The squares are copied and pasted onto Layer 1.
Step 43 : Press CTRL+ALT+G to clip Layer 1 with the Horizontal Layer.
Step 44 : Click on Vertical Layer.
Step 45 : Go to Select>Load Selection.
Step 46 : The Load Selection dialogue box comes up. For the Channel select squares saved earlier. Click OK.
Step 47 : The selection is loaded.
Step 48 : Click on Subtract from selection in top panel.
Step 49 : Drag around alternative squares. The squares should be different from the ones selected earlier.
Step 50 : The alternative squares have been removed.
Step 51 : Press CTRL+J. The squares are copied and pasted on Layer 2.
Step 52 : Press CTRL+ALT+G to clip the layer.
Step 53 : Click the Layer Style button. Click on Outer Glow.
Step 54 : In the Outer Glow the color has to be changed. Click where the small white hand points.
Step 55 : The Color Picker opens. Type 000000 in the highlighted box at the bottom. It stands for Black. Click OK.
Step 56 : Change the Blend Mode to Multiply.
Step 57 : Drag the Size slider while watching your image. How much you drag the slider will depend on your image. I have set the Size at 150. Drag the Opacity slider to 100%. Click OK.
Step 58 : The image looks like this.
Step 59 : Press ALT and drag the fx icon to Layer 1.
The finished Weave Effect.
Other Photoshop tutorials are
here


 Step 3 : Click on the Background Layer.
 Step 4 : Make sure the Foreground/Background Color is set to Black/White. If it is not press x and then d on the keyboard to restore the default.


