Textures can add something special to an image. You can use it for special effects. The fun with using Textures together with different Blend Mode is that you do not know what the end result will be and gives a lot of scope fore experimenting.
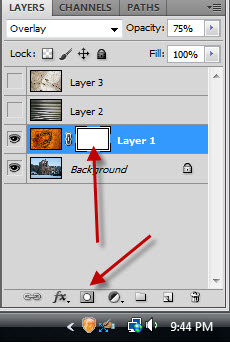
This is how the layers palette looks. The eye icon is turned on only in the Background Layer. I have turned off the eye icons on the three layers above containing the Textures.
Step 1 : Turn on eye icon on Layer 1 which contains the Rust Texture.
Step 2 : Change the Blend Mode of Layer 1 to Overlay.
Step 3 : Drop the Opacity of the layer to 75%.
The image looks like this.
Step 4 : Click the layer Mask button. A Layer mask forms next to the layer thumbnail on Layer1.
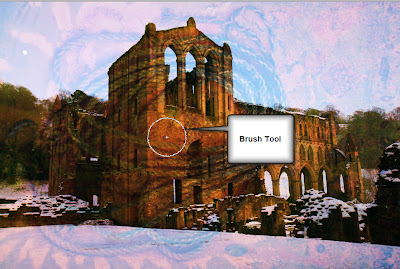
Step 5 : Press b on the keyboard. It is the shortcut for the Brush Tool. Press [ (left bracket) to make the Brush small. Press ] (right bracket) to make it large. Press SHIFT+[ to make the Brush soft. Press SHIFT+] to make the Brush hard. Here we will be using a soft brush.
You can also set the Size and Hardness by clicking in the top panel to reveal the Brush Controls.
Step 6 : The Foreground/Background colors should be set to the default Black/White. If it is not press x and then d on the keyboard to restore the default.
Step 7 : Begin painting with Black. Black reveals and white hides. Should you paint away a portion by mistake, change the Foreground Color to White and paint away the mistake. Then resume painting with Black. You should also change the Brush Size as you paint on different parts of the image.
The image looks like this after painting with Black to reveal the building.
Step 8 : Click on Layer 2 and turn on the eye icon.
Step 9 : Change the Blend Mode of Layer 2 to Hard Light. There is nothing hard and fast about it. Overlay and Soft Light can also work depending on the image you are using.
Step 10 : I have dropped the Opacity of the Layer 2 to 50%.
The image looks like this.
Step 11 : Click the Layer Mask button. A Layer Mask forms on Layer 2.
Step 12 : Press b for the Brush Tool. The Brush is already set to Soft from the last time. With the Foreground Color set to Black, I am painting the sky.
Step 13 : Zoom into the image to be able to paint accurately with the Brush.
Step 14 : After finishing painting, reduce the Fill of Layer 2 to 70%.
The image looks like this so far.
Step 15 : Click on Layer 3. Turn on the eye icon of the layer. Change the Blend Mode to Overlay.
The image looks like this.
Step 16 : Click the layer Mask button. A Layer Mask forms on Layer3.
Step 17 : Press b for the Brush Tool. With the Foreground Color set to Black, I have painted out a crack in the sky.
The image looks like this.
Step 18 : Press CTRL+SHIFT+ALT+E to make a composite Layer4.
Step 19 : Press CTRL+J. Layer 5 copy forms.
Step 20 : Change the Blend Mode to Multiply. Reduce the Opacity to 50%.
The completed image.
Other photoshop tutorials are
here.