


 Step 1 : Open a New Transparent document with Width of 100 and Height 100. It will be a small document. The Color Mode should be RGB Color. Click ok.
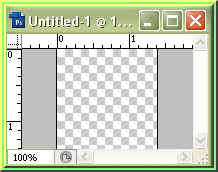 This is how it looks.
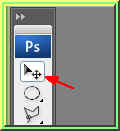
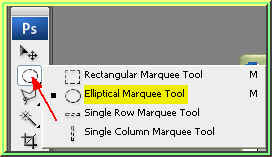 Step 2 : Press D then X on your keyboard then select the Elliptical Marquee Tool.
 Step 3 : On the top panel set Style from the drop down menu to Fixed Size and set the Width and Height to 100 pixel. Anti-alias should be checked.
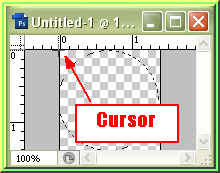 Step 4 : Place your cursor which looks like + (a plus sign) precisely on top left corner of the document and left click. A selection will immediately appear in the centre of the transparent document as above.
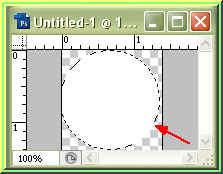 Step 5 : Press ALT+BACK SPACE on your keyboard and circle will be filled with White.
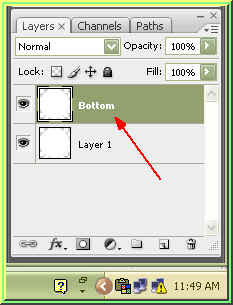 Step 6 : Right Click Layer 1 and when the New layer dialogue box opens Name it as Botttom. Press CTRL+D to deselect.
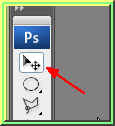
 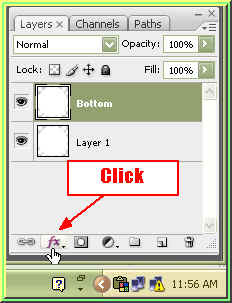 Step 7 : Click on the Add Layer Style buttton as shown by the arrow.
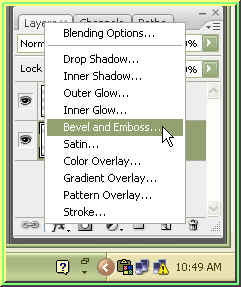 Step 8 : From the popup click Bevel and Emboss.
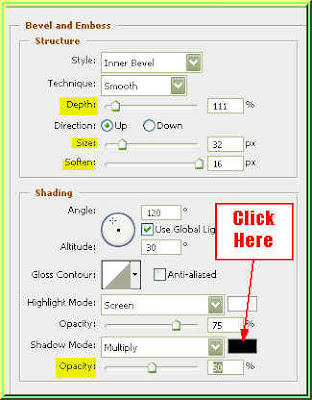 Step 9 : In the Bevel and Emboss dialogue box set the Depth at 111, Size at 32, Soften at 16 and Opacity at 50 %. Do not click ok. Now click on the Black box the arrow points to.
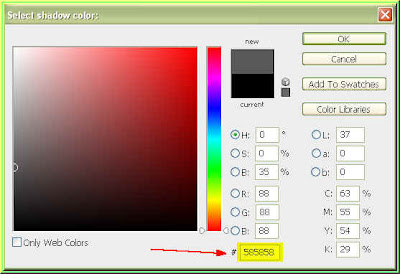 Step 10 : Clicking on the black box, brings up the Color Picker. In the highlighted box put a value of 585858. Click ok in the Color Picker. Click ok in the Bevel and Emboss dialogue box.
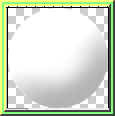 This is how your image should look.
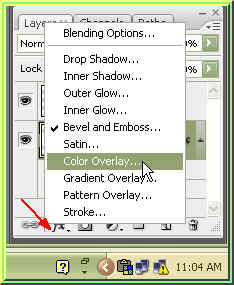 Step 11 : Again click the Add Layer Style button and then click on Color Overlay from the popup.
 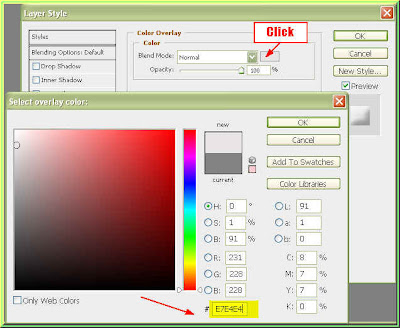 Step 12 : When the Color Overlay opens click the box the arrow points to bring up the Color Picker again. In the highlighted box put he value of E7E4E4. Click ok in the COlor Picker the click ok in the Color Overlay dialogue box.
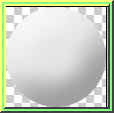 This is how the image looks.
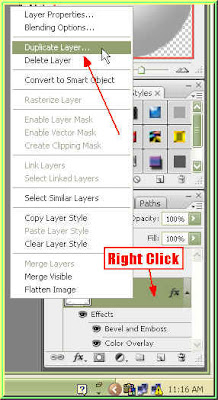 Step 13 : Right Click Layer 1. A popup will appear. From it click on Duplicate Layer. Name the New Layer Iris.
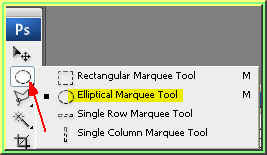 Step 14 : Select the Elliptical Marquee Tool.
Step 14 : On the top panel setthe Feather t 2 px, Style as Fixed Size and Width and Height as 50 px. The Anti-alias should be checked.
 Step 15 : Click on the Foreground Color.
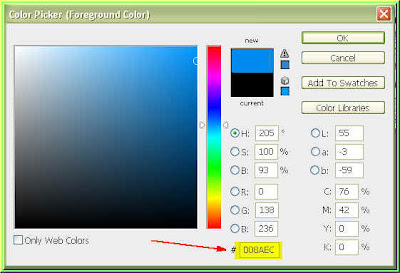 Step 16 : This will bring up the Color Picker. Place a value of 008AEC and click ok.
The Foreground color has changed to the color I picked.
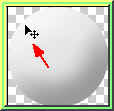 Step 17 : Place your cursor towards the left corner as shown and left click.
 Step 18 : A selection immediately appears.
Step 19 : Press ALT+Backspace and the selection will be filled with the chosen color.
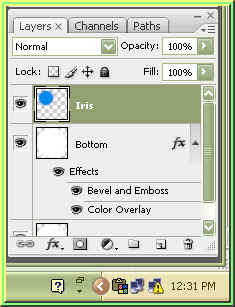
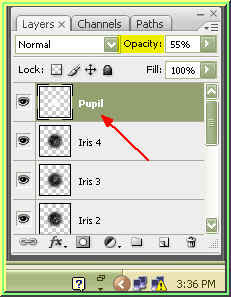
Step 20 : This is how the Layers pallette looks.
 Step 21 : Click the Move Tool to select it. Then press CTRL+A (or Select All).
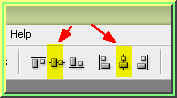 Step 22 : On the top panel you will find these symbols for alignment. Click the Second and the Fifth.
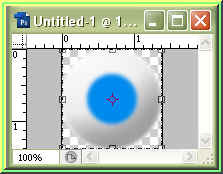
Step 23 : The 'Iris' moves to the centre of the 'eyeball' dramatically. Press CTRL+D to deselect.
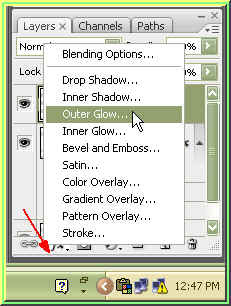 Step 24 : Again click the Add Layer Style button and from the popupclick on Outer Glow.
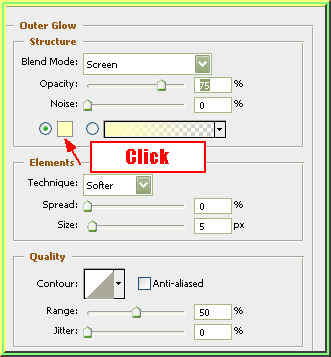 Step 25 : The Outer Glow dialogue box opens. Click where the arrow points for bringing up the Color Picker.
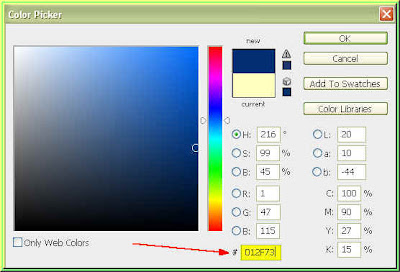 Step 26 : In the Color Picker change the value in the highlighted box to 012F73. Click ok in the Color Picker.
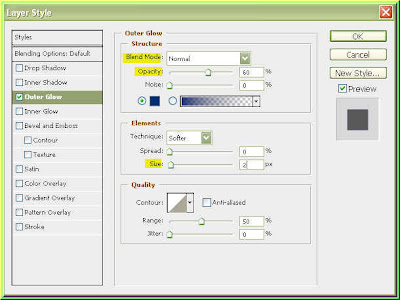 Step 27 : In the Outer Glow dialogue box change the Blend Mode to Normal. Decrease the Opacity to 60 % and Size to 2 %.
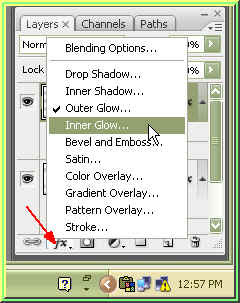 Step 28 : Again click the Add a Layer Style Button and choose Inner Glow.
 Step 29 : In the Inner Glow dialogue box bring up the Color Picker by clicking on small color and add change the value to 012F73. Exit the Color Picker by clicking ok. Then in the Inner Glow dialogue box change the Blend Mode to Normal, lower the Opacity to 55 % and Size to 0. Click ok.
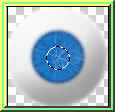
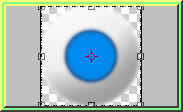 This is how the eye looks like.
 Step 30 : Press CTRL+SHIFT+N to bring up the New dialogue box. Name it Iris 2.
The Iris 2 layer has formed. Step 31 : Click on the Iris layer. Then CTRL+Click the layer thumbnail (where the small white hand points).
 A selection forms around the iris.
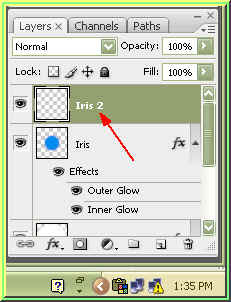
Step 32 : Now click on the Iris 2 layer.
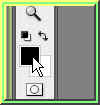
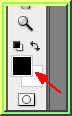 Step 33 : Press D on the keyboard. This will restore the default Black as the Foreground and White as the Background.
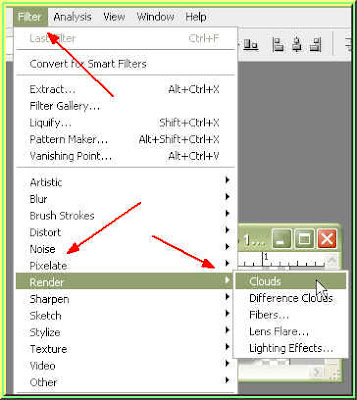 Step 34 : Go to Filter>Render Clouds.
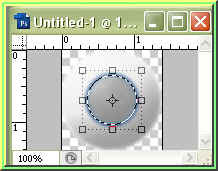 This is how it looks.
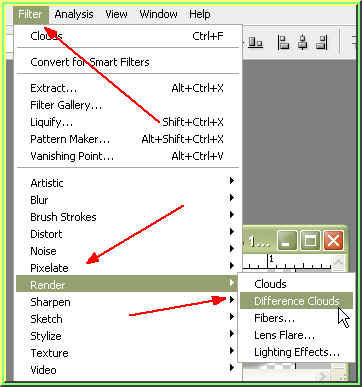
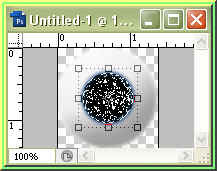
Step 35 : Go to Filter>Render>Difference Clouds.
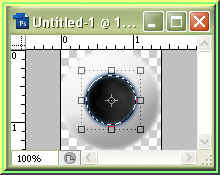
This is how the eye looks.
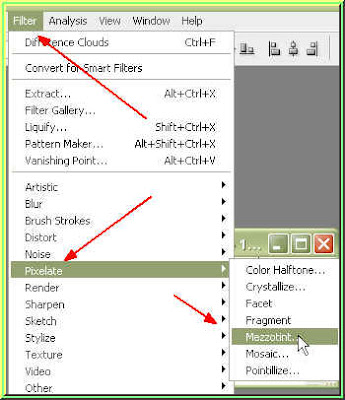 Step 36 : Go to Filter>Pixelate>Mezzotint.
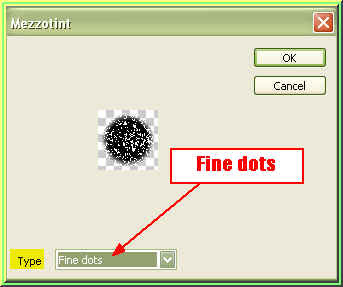
Step 37 : Choose Fine Dots.
This is how the eye looks.
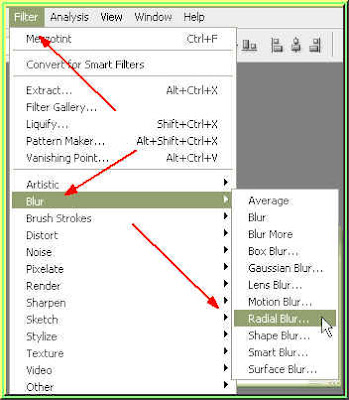 Step 38 : Go to Filter>Blur>Radial Blur.
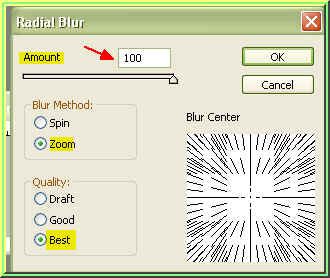 Step 39 : In the Radial Blur dialogue Box set the Amount to 100, Blur Methods to Zoom and Quality to Best, Click ok.
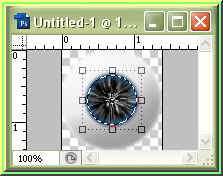
This is how the eye looks.
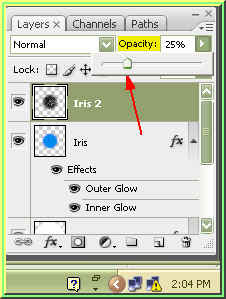 Step 40 : Lower the opacity of the Iris 2 layer to 25 %.
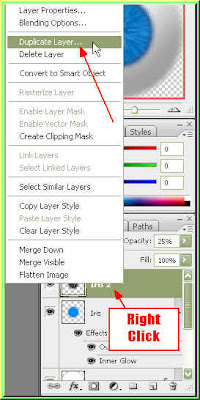 Step 41 : Now right click the Iris 2 layer and click on Duplicate Layer.
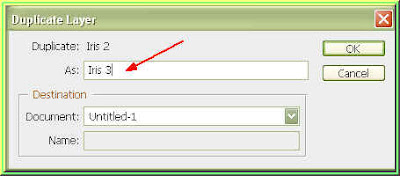 Step 42 : Name the duplicate layer Iris 3.
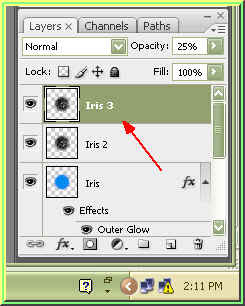 The iris 3 layer has formed.
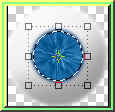
This is how the eye looks.
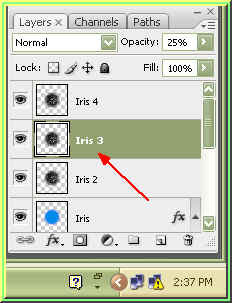
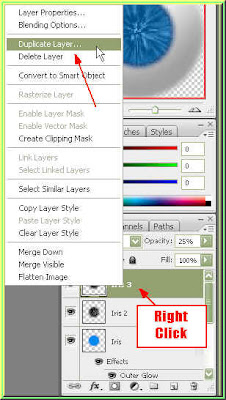 Step 43 : Again right click the Iris 3 layer and click Duplicate Layer.
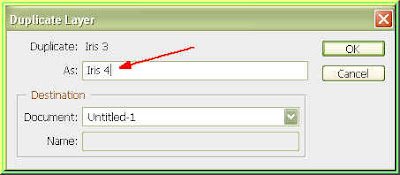 Step 44 : Rename the duplicate layer Iris 4.
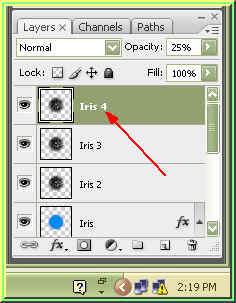
The Iris 4 layer has formed.
 Step 45 : Select Iris 3 layer.
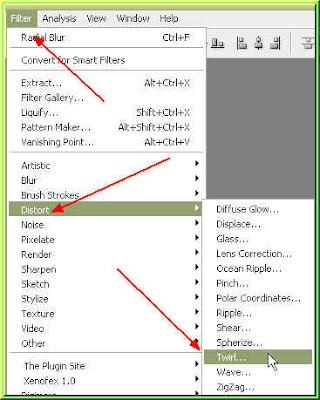 Step 46 : Go to Filter>Distort>Twirl.
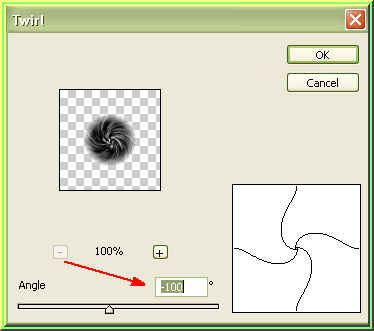
Step 47 : In the Twirl dialogue box set the Angle at -100. Click ok.
 Step 48 : Now click on Iris 4 layer.
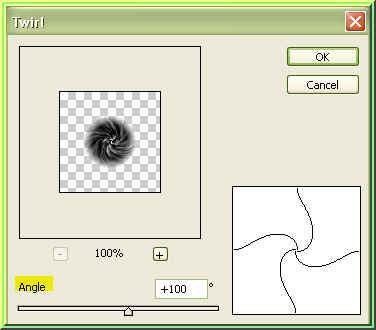 Step 49 : Again got to Filter>Distort>twirl. Now set the Angle at +100. Click ok.
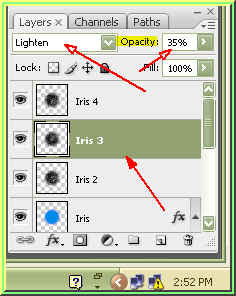
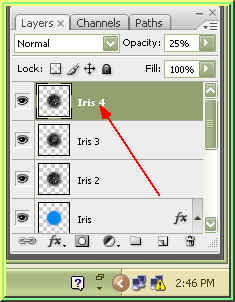
Step 50 : Click on Iris 3 layer. Change the Blend Mode to Lighten, reduce the Opacity to 35 %.

Step 51 : Click on Iris 4 Layer. Again change the Blend Mode to Lighten and reduce the Opacity to 35 %.
Step 52 : Click the Elliptical Marquee Tool.
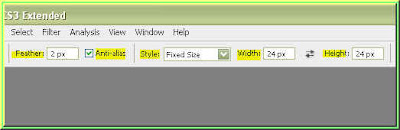
Step 53 : In the top penl set the Feather at 2 px, check Anti-alias, Style should be Fixed Size, and Width and Height at 24 px.
Step 54 : Left CLick on the centre of the image and small selection will appear as above.
Step 55 : Press CTRL+BAckSpace and the circular selection will be filled with White. Press CTRL+D to deselect.
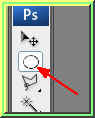
 Step 56 : Press CTRL+A. Then click on Move Tool.
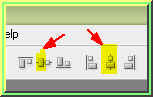
Step 57 : On the top panel click on the 2nd and 5th aligments. Press CTRL+D to deselect.
 Step 58 : Lower the opacity of the Pupil layer to 55 %.
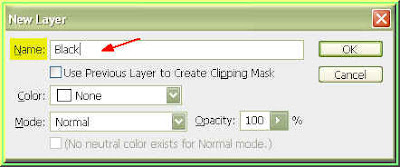


Step 62 : Left click near the centre and a small circular selection will appear.
Step 63 : Press Alt+Backspace and the selection will be filled with Black. Press CTRL+D to deselect. 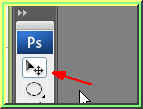
Step 64 : Press CTRL+A, then click the Move Tool.

Step 65 : On the toppanel click the 2nd and 5th aligments.

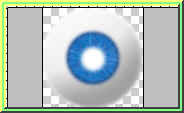
And there is the eye.

Step 66 : This is an optional step. Click the Polygon Lasso Tool.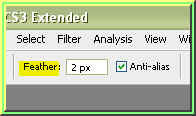
Step 67 : Set the Feather at 2 px.

Step 68 : Make tiny triangles with the Polygon Lasso Tool.

Step 69 : Press CTRL+A to fill with White. Reduce the Opacity of the layer to 90 per cent.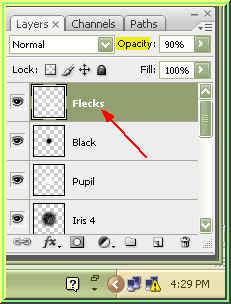
Step 70 : The opacity of the Flecks layer has been reduced to 90 %.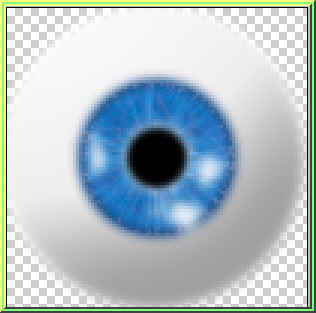
An enlarged view of the eye just made. That is all.


