


Let's see what we can do with Brushes in Photoshop. There are many things to be done with a Brush beside paint with it. You can vary its size by pressing [ (left bracket key) and ] (right bracket key). The [ (left bracket) makes the Brush small. The ] (right bracket) makes it large. To make a Brush soft press SHIFT+[ (left bracket). To make it hard press SHIFT+] (right bracket).

To access the Brush Tool, the easiest way is to press the letter b on the keyboard. To access the Brush Controls click in the top panel where shown. It reveals the default set of Brushes.

Drag the slider down at the right to see the remaining Brushes. Photoshop has all these Brushes and more.

Click the tiny black arrow to reveal the other Brush Sets. Not all that are visible here will be found in Photoshop. I have downloaded and installed some free brushes available on the internet.

You can find this free Fractal Brush here
It belongs to ~Scully7491
You will need to register to download this free Brush. Registration is free.

Go to the link and download the Brush.

Download the Brush to a folder on your computer. Some files are in zip file, some in rar. Some are available as abr files.

This Brush is in a zip file. Right click to Extract the Brush.

The Brush has been extracted. It is an abr file.

Open Photoshop. There should be no image. Open the folder which contains the Brush.
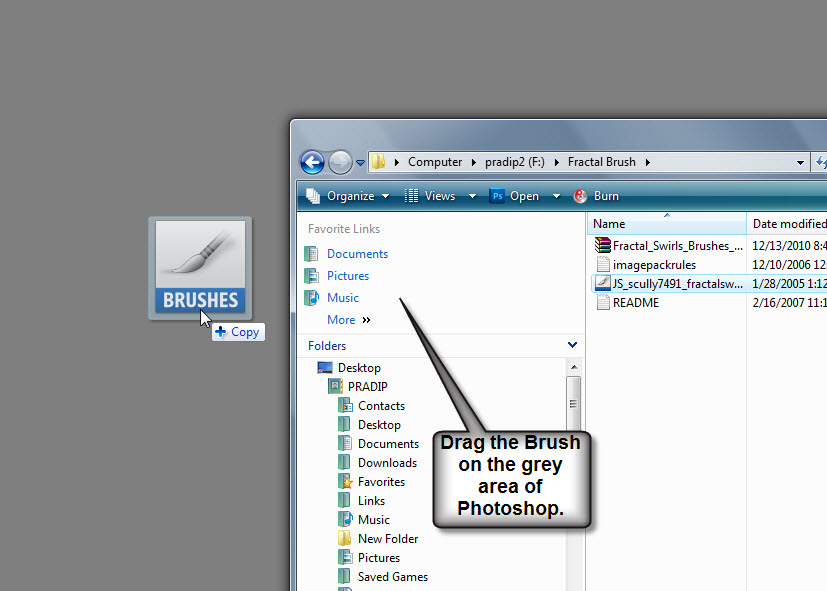
Drag the Brush from the folder to the grey area of photoshop. No image should be open. When you drag a +Copy appears below the Brush.

Let go after dragging the Brush to the grey area. The Brush is no longer visible.

Click again in the top panel to reveal the Brush controls. Scroll to the bottom. You will find the Brushes in the bottom row and three others above it. This is the easiest way to install a Brush in Photoshop.

Download these free Brushes also. You will find it here
It belongs to *Chris10
Install it in Photoshop. You will find very good free brushes at http://www.deviantart.com/

Step 1 : Open a New White document in Photoshop.

Step 2 : Click the New Layer icon and a new Layer 1 forms.

Step 3 : Install the Brush as I showed you. I had installed the Brush earlier by going to Brushes folder in Photoshop, which is a long winded process. Therefore I will have to click in the top panel, then the tiny black arrow at right. From the pop up menu I have found the Brush I was looking for.

Step 4 : This dialogue box opens. I am clicking on OK.

The Brushes have been installed.

Step 5 : I have clicked on a Brush. It's number is 1082.

The Brush is a large one.

Step 6 : Press [ (left bracket) to decrease the size of the Brush so that it fits on the White Layer.
Click once with the Brush.

Step 7 : Click once with the Brush.

You can see the Brush on Layer 1 in the Layers palette.

Step 8 : CTRL+CLICK the thumbnail on Layer 1.

A selection of marching ants immediately surround the silhouette.

Step 9 : Press DELETE. The black silhouette disappears. Just the marching ants remain.

Step 10 : Click in the top panel to bring up the Brush controls. Click the tiny black arrow. Click on Reset Brushes. You must always reset the Brush, otherwise the last used brush becomes the default brush.

Step 11 : Again this dialogue box appears. Click OK.

The default brushes are back.

Scroll to the bottom. The Brush installed earlier is no longer there. This is because the Brushes have been reset.

Step 12 : Click in the top panel. Click the tiny black arrow. Click on Load Brushes.

Step 13 : Navigate to the folder where you kept the Brush. Click it to load it into Photoshop.

Step 14 : You will find the Fractal Brushes at the bottom.

Step 15 : I have clicked on Brush 494.

Step 16 : This is how the Brush looks.

Step 17 : Make the Brush larger by pressing ] (right bracket).

Step 18 : Click once with the Brush. This is how the image looks.

Step 19 : I have clicked on the left panel where additional Brush controls are located. In other versions you will find a black square at the top right, clicking which brings up the same dialogue box.

Step 20 : Click Scattering. Next click on Brush tip shape. Next drag the Spacing slider to the right to make the Brush tip separate.

Step 21 : Click the double arrow at the top of the Brush controls to make the Brush go away.

Step 22 : Make the Brush small by pressing [ (left bracket).

Step 23 : Click the New Layer icon. A new Layer 2 forms.

Step 24 : Drag with the Brush tool gently. You will get something like this. Note that the selection is still in place.

Step 25 : Press CTRL+D to deselect. The image looks like this.

Step 26 : Click the New Layer icon and a new Layer 3 forms.

Step 27 : Click in the top panel to reveal the Brushes. I have now clicked on Brush No 345

Step 28 : This is how this Brush looks like.

Step 29 : Bring up the additional Brush Controls. Click on Scattering.

Step 30 : Click on Brush tip shape. Drag the Spacing slider to make the Brush tip separate.
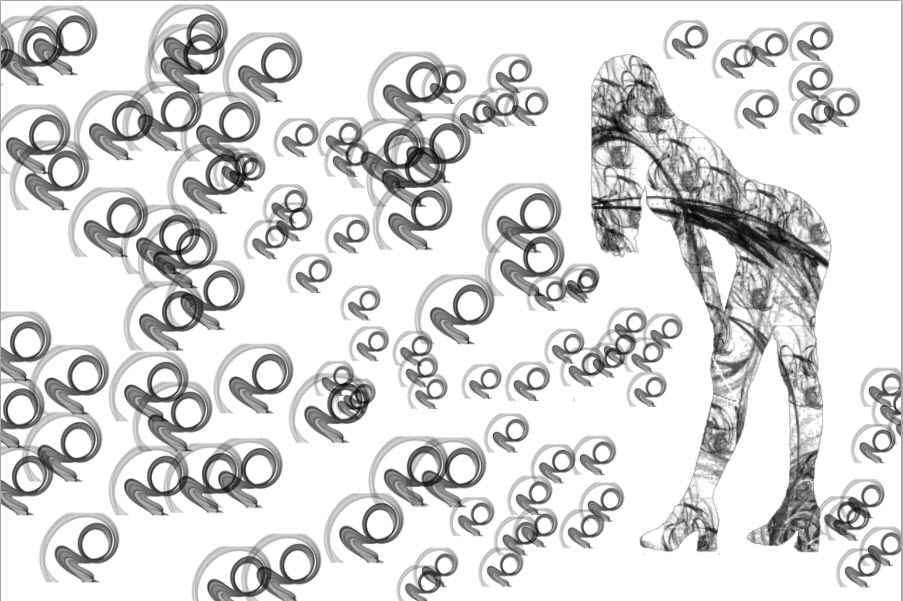
Step 31 : Make the Brush small using the [ (left bracket) and to make it large ] (right bracket) Drag with the Brush to get this effect. Take care to remain away from the silhouette. That's all. Now you know how to load a Brush into Photoshop and how to manipulate it. Have fun.
Other photoshop tutorials are here


