


With Christmas just some weeks away it is time for another Christmas Card in Photoshop. You need not be an expert to follow this tutorial. Those who have good knowledge of photoshop will find that they can skip quite a few steps. I have made it particularly detailed to help beginners with something ambitious.

Step 1 : Open a new White Document.

Step 2 : Click the Foreground Color. The default is set to Black and Background to White. If it is not press x and then d on the keyboard to restore the default setting. Click on a bright shade of Red by clicking at the top right of the box at left. As soon as you click you can read this value at the bottom. It represents the color. You need not bother about it. If you want to use the exact shade I have selected type in fc404 as is given in the bottom. Click OK in the Color Picker.

The Foreground Color changes to the Color picked.

Step 3 : Press ALT+BACKSPACE to fill with the Foreground Color which happens to be Red.

Step 4 : Click the Pen Tool. Now don't throw up your hands. I will show you how to use it. You need to use it just a little here. So go along and click the Pen Tool bravely.

Step 5 : Click somewhere at the bottom around midway with the Pen Tool.

Step 6 : Click a second point around midway up at the side. A straight line will connect both points immediately.

Step 7 : Without letting go of the cursor, drag to the right. The line will begin bending as you can see,

Step 8 : Click a third point right at the top.
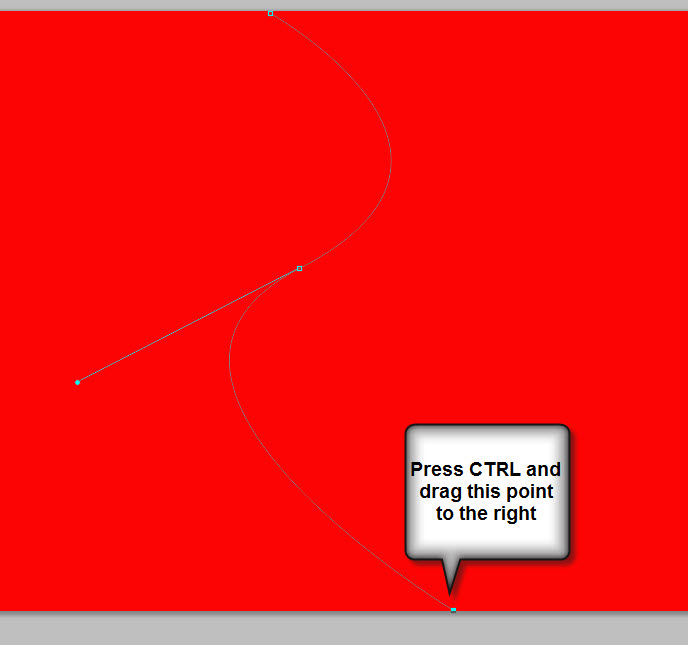
Step 9 : Press CTRL and drag this point to the right. As soon as you press CTRL, the cursor will change into a small white arrow.

Step 10 : Press CTRL again and drag the second point to the right. The line between the first point and second point bends.

Step 11 : Press CTRL and drag the the third point at the top. What I am attempting is to make an S curve.

Step 12 : Press CTRL and drag the first point below red background and third point above the background.

Step 13 : Press ALT and click a fourth point At the top right slightly above the red background.

Step 14 : Press ALT and click a fifth point.

Step 15 : Press ALT and click back on the first point. A pen icon appears with a small circle beside it. It means that the path is being closed.

Step 16 : click on the Paths palette.

Step 17 : You can see the Work path.

Step 18 : Right click on the Work path thumbnail. A pop up comes up. Click on Make Selection.

Step 19 : The Make Selection dialogue box comes up. Set a Feather radius of 1. Click OK.

Step 20 : As soon as you click OK the selection turns into a column of marching ants.

Step 21 : Click back on The Layers palette. Press CTRL+J. A new new Layer 1 forms.

Step 22 : CTRL+CLICK layer thumbnail.

Step 23 : As soon as you CTR+CLICK a selection of marching ants form.

Step 24 : Click the Foreground Color to bring up the Color Picker. Since Red has already been selected bring the cursor down along the right side at click on a darker color. As soon as you click the value of the color can be seen at the bottom. The red is 860404. Click OK in the Color Picker.

The Foreground Color changes the color picked.

Step 25 : Press ALT+BACKSPACE. The selection is filled with the Foreground Color.

Step 26 : Press CTRL+D to deselect. The marching ants go away.

Step 27 : Press CTRL+J. A new Layer 1 copy forms.

Step 28 : Press CTRL+T. A selection forms.

Step 29 : Right click inside the selection.A pop up appears. Click on Flip Horizontal.

Step 30 : Click the Move Tool.

Step 31 : This dialogue box appears. Click Apply.

Step 32 : Since the Move Tool is already selected. Press SHIFT and move the selection to the left.

Step 33 : Press CTRL+T. A selection forms.

Step 34 : Push the selection inwards. Press ENTER.

Step 35 : Press CTRL+J. A new Layer 1 copy 2 forms.

Step 36 : Press CTRL+T. A selection forms. Click inside. From the pop up click on Flip Vertical.

Step 37 : Press SHIFT and move the selection to the right.

Step 38 : Hover the cursor on an corner. A small bent, two headed arrow appears.

Step 39 : Use the bent arrow to rotate the selection.

Step 40 : Click inside the selection and drag up. Use the bent arrow to align it at the top correctly.

Step 41 Drag the middle corner handles to the left and right outwards. Press ENTER.

Step 42 : Press CTRL+J. layer 1 copy 2 duplicates into Layer 1 copy 3.

Step 43 : Press CTRL+T. A selection forms.

Step 44 : Right click inside he selection. A pop up appears. Click on Flip Vertical.

Step 45 : Press SHIFT and drag the selection to the bottom.
Press ENTER.

Step 46 : Right click the topmost Layer. It is the one I am on. From the pop up click on Blending Options.

Step 47 : Click on Outer Glow in the Blending Options dialogue box that comes up.

Step 48 : Click to set the color of glow.

Step 49 : The Color Picker comes up. Click on a brighter red at the top right.

The color of the glow has changed to the color picked.

Step 50 : I have dragged the Size slider to 75 and the Spread to 8 in that order. Click OK.

The image looks like this.

Step 51 : Right click Layer 1 copy 3.

Step 52 : From the pop up click on Copy Layer Style.

Step 53 : Click on layer 1 copy 2.

Step 54 : Right click the layer and click on Paste Layer Style.

Step 55 : Click on Layer 1 copy.

Step 56 : Right click the layer. Click on Paste Layer Style.

Step 57 : Click on Layer 1.

Step 58 : Right click the layer and Paste Layer Style.

The image looks like this.

Step 59 : Double click the Outer Glow on Layer 1 copy.

Step 60 : Click on the outer glow color.

Step 61. The Color Picker comes up. Click on the bottom color as shown.

Step 62 : The color is selected as soon as you click. The numerical value of the color is given at the bottom.

Step 63 : Click on a lighter shade. It's numerical value appears at the bottom. Click OK in the color picker. Click OK in Outer Glow.

Step 64 : Click Layer 1.

Step 65 : Click Outer Glow under Layer1. The Blending Options comes up. Click on set color of outer glow.

Step 66 : Type in ea8282 it is the same color as the outer glow set in Step 62. Click OK in Color Picker and Blending Options.

Step 67 : The image looks like this. I changed the Outer Glow in Layer 1 copy and Layer 1 as they were not visible in Step 57.

Step 68 : Click on the topmost layer which is Layer 1 copy 3.

Step 69 : Click on the New Layer icon at the bottom of the Layers palette. A new Layer 2 forms above Layer 1 copy 3.

Step 70 : Click the Elliptical Marquee Tool.

Step 71 : Keeping SHIFT pressed, drag out with the Elliptical Marquee. A perfect circle forms.

Step 72 : Click the Foreground Color. The Color Picker appears. Click on the lighter color of the glow. Click OK in the Color Picker.

The Foreground Color changes to the color picked.

Step 73 : Press ALT+BACKSPACE. The circle is filled with the Foreground Color.

Step 74 : Right click Layer 2. Click on Blending Options from the popup.

Step 75 : Click on Inner Glow.

Step 76 : Click to change the color of the inner glow.

Step 77 : Type in 000000 at the bottom when the Color Picker appears. It is the numerical value for Black.
Click OK in the Color Picker.

Step 78 : Change the Blend Mode of Inner Glow to Normal from Screen.

Step 79 : Drag the Size slider quite high. Then drop the Opacity to around 45% to 50%.

The image looks like this.

Step 80 : Press CTRL+J. Layer 2 duplicates into Layer 3
The marching ants surrounding the circle go away. CTRL+CLICK the Layer thumbnail on Layer 3 to make it return.

Step 81 : Change the Blend Mode of Layer 3 to Color Dodge.

Step 82 : Use the small bent arrow to switch the Foreground/Background color to White or press x on the keyboard.

Step 83 : Press b to bring up the Brush Tool. To make the size of the brush large press ] (right bracket) and to make it small [ (left bracket). To make the Brush soft press SHIFT+[ (left bracket). To make it hard press SHIFT+] (right bracket). We will be using a soft brush.
Paint in the highlights in the middle and the bottom.

Step 84 : Go to Filter>Blur>Gaussian Blur.

Step 85 : When the Gaussian Blur dialogue box appears drag the slider till the highlights blur out. Click OK in the Blur dialogue box.

Step 86 : Press SHIFT and click on Layer2. Bother Layer 3 and Layer 2 are highlighted.

Step 87 : Press CTRL+E. Both layers merge into Layer 3.

Step 88 : CTRL+Clcik layer thumbnail on Layer 3. A selection reappears around the circle.

Step 89 : Press b to bring up the Brush Tool. Click in the top panel. The Brush controls open. Scrolldown and you will find 'Flowing Stars' which is Brush No 29. Click to select it.

Step 90 : Click on the right to bring up more controls of the Brush. In earlier versions of Photoshop you will find a small square in the top panel which will reveal these controls. Check Scattering and Smoothing. Drag the Spacing slider till the stars separate.

Step 91 : The Foreground should be set to White.

Step 92 : Click the New Layer icon. Layer 4 forms.

Step 93 : Drag gently with the Brush. Do not over do it.

Step 94 : Go to Filter>Distort>Spherize.

Step 95 : The Sperize dialogue box opens. Click OK.

The sphere looks like this after applying Spherize.

Step 96 : Press SHIFT. Click on Layer 3. Both layer 4 and 3 are highlighted.

Step 97 : The two layers merge into Layer 4.

Step 98 : Press CTRL+D to deselect.

Step 99 : Lower the Opacity of the Layer to 74/75 %.

The card looks like this so far.

Step 100 : Press CTRL+J. Layer 4 duplicates into Layer 4copy.

Step 101 : Click the Move Tool.

Step 102 : Drag with the Move Tool.

Step 103 : Press CTRL+J. Layer 4 copy duplicates into Layer 4 copy 2.

Step 104 : Press v to bring up the Move Tool. Drag the new layer to the left.

Step 105 : Press CTRL+U to Bring u Hue/Saturation. Drag the Hue slider either to the left or right to change the color. Click OK.

This is how the left sphere looks after changing Color.

Step 106 : Click on Layer 4.

Step 107 : Again drag the Hue slider till the sphere changes color. Click OK.

The image looks like this.

Step 108 : Right click Layer 4. Click on Blending Options.

Step 109 : In Blending Options click on Drop Shadow.
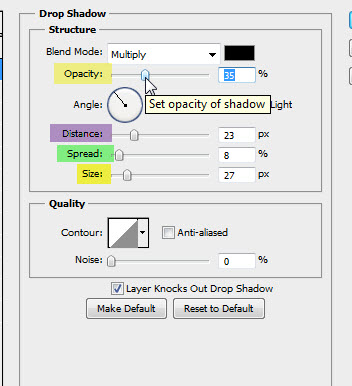
Step 110 : Drag the Distance slider first, then the Size slider. Increase Spread a bit. Lastly reduce the Opacity.
Click OK.

Step 111 : Right click Layer 4. Click on Copy Layer Style from the pop up.

Step 112 : Click on Layer 4 copy.

Step 113 : Right click the Layer. Click on Paste Layer Style.

Step 114 : Click on layer 4 copy 2.

Step 115 : Right click and click on Paste Layer Style.

The image looks like this.

Step 116 : Click on the New layer icon. A new Layer 5 forms.

Step 117 : Click the Pen Tool.

Step 118 : Click at the top of the Sphere Press SHIFT and click at the top. A straight line connects the two points.

Step 119 : The last brush used was Flowing Stars. The Brush has to be reset to normal. Click at the top to open the Brush controls. Click the tiny arrow at the left. From the drop down click on Reset Brushes.

Step 120 : This dialogue box opens. Click OK.

Click the Brush controls to bring up the Brush controls. Uncheck all boxes under Brush Tip Shape.

Step 121 : Position the Brush on the line drawn.

Step 122 : Press [ (left bracket key) till the Brush becomes tiny and just bigger than the line.

The Foreground Color should be set to White.

Step 123 : Click the paths palette.

Step 124 : Right click Work path. From the pop up click on Stroke Path.

Step 125 : The Stroke Path dialogue box opens. From the Dropdown select Brush as the Tool.

Step 126 : The stroke has been applied.

Step 127 : Click anywhere below the Work path.

Step 128 : The line inside the stroke has disappeared.

Step 129 : Click two points with the Pen Tool again.

Step 130 : Stroke with Brush.

Step 131 : All the three baubles have strings now.

Step 132 : Drop the Opacity to around 45%.

The image looks like this.

Step 133 : Click the Type Tool and then the Horizontal Type Tool.

Step 134 : click in the top panel to reveal the fonts available. Set the Size by typing a value.

Step 135 : The default Color of the Font is set to Black.

Step 136 : Draw out the text box with the Type Tool.

Step 137 : Type out your Text. I have typed out my Text.

This is how the Text Layer looks.

Step 138 : Right click the text layer and click on Rasterize Layer from the popup.

Step 139 : The Text layer has been rasterized. CTRL+CLICK the layer thumbnail.

Marching ants immediately select the Text.

Step 140 : Click the Foreground Color. The Color Picker comes up. Click on the color at the bottom. The color is selected. Click OK in the Color Picker.

Step 141 : The Foreground Color changes to color picked.

Step 142 : Press ALT+BACKSPACE. The selection fills with the color picked. It is the same as the background color.

Step 143 : Press CTRL+D to deselect. The Text can hardly be made out.

Step 144 : Right click the Text layer. Click on Blending Options from the pop up.

Step 145 : In Blending Options click on Outer Glow.

Step 146 : I have set the Size at 15 and Spread at 5. Click OK.

This is how the Christmas card looks.

Step 147 : Click on Layer 1 copy 2. You can see which layer it is.

Step 148 : Go to Filter>Render>Lighting Effects.

Step 149 : In the Lighting dialogue box that opens change the Style to Three Down. Click OK.

The finished Christmas Card.
Other photoshop tutorials are here


