A good photographer may not need photoshop or may even look down upon photoshopped images. But for people who are not great photographers like me, can find a lot of help from photoshop. There is a particular effect that I have in mind for this tutorial which is to keep the image sharp while blurring and giving an effect to the background. This makes the image look very prominent.
Step 2 : Zoom into the image.
Step 3 : Use the Pen Tool cut out the image from the Background. If you do not know how to us the Pen Tool, please see
here where it is explained very simply.
Step 4 : After the image is selected with Pen Tool. Press CTRL+J to copy and paste the selection on a new Layer1. Turn off the eye icon on Background layer.
The cut out image looks like this on a transparent background.
Step5 : Click on the Background layer.
Step 6 : Turn the eye icon on the Background Layer
Step 7 : Go to Filter>Blur> Gaussian Blur.
Step 8 : The Gaussian Blur dialogue box opens. Drag the Radius slider till a blurring effect is achieved. You will be able to see the effect on the image as you drag the slider. There is nothing hard and fast about it. It will depend on your image. Click OK.
Step 9 : The background has been blurred, but not enough to make the details disappear.
Step 10 : Click the Adjustment Layer button at the button of the Layers palette. Click Curves from the popup.
Step 11 : In the Curves dialogue box click on the Red channel from the drop down menu.
Step 12 : Place the cursor as show. The cursor is the small cross.
Step 13: Drag diagonally up slightly.
Step 14 : Drag the diagonal at the bottom as shown.
Step 15 : Now drag it as shown.
The reds have been pumped up after tweaking the red channel.
Step 16 : Now click on the Blue Channel.
Step 17 : Push the diagonal about half way or a bit more down the right side. Push up the left side about a little more than halfway up the square at the bottom.
The Blues have increased in strength .
Step 18 : Click on the Green Channel.
Step 19 : Drag the diagonal in a gentle S curve.
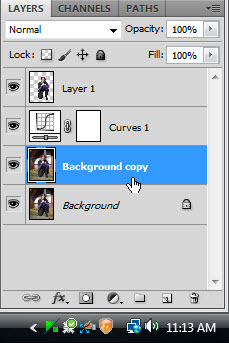
Step 20 : Click on the Background Layer and press CTRL+J. The Background layer duplicates into Background copy. Press CTRL+SHIFT+U to desaturate it.
Step 21 : Drag the Background copy above the Curves 1 Layer.
The image looks like this.
Step 22 : Decrease Opacity to around 65%
The image looks like this. The Background has a washed out look. The focus is on the kneeling figure.
Other Photohop tutorials are
here


