


With the end of 2010 drawing near it will soon be time for the count down. How about making a clock in Photoshop for the count down on New Year's Eve?

Step 1 Open a new white document.

Step 2 : Select the Elliptical Marquee Tool.

Step 3 : Keeping SHIFT pressed draw out a large circle.

Step 4 : Press CTRL+J. The selection is copied and pasted onto Layer 1.

Step 5 : Turn off the eye icon in the Background layer.

The image looks like this.

Step 6 : A texture is required. I will be using this paper texture. You will find it here
It belongs to ~ofruin-stock
You can use it for free.

Step 7 : Open it in Photoshop. Press CTRL+A (Select ALL), the CTRL+C (Copy).

Step 8 : Click on the other image. Press CTRL+V. The is a high resolution texture. It covers the entire clock face we were making.

Step 9 : Press v for the Move Tool. Position the Texture appropriately.

Step 10 : Click between Layer1 and Layer2.

The layer is clipped with the one below.

The image looks like this.

Step 11 : CTRL+CLICK Layer1.

As soon as you CTRL+CLICK a selection forms around the circle.

Step 12 : Go to Filter>Distort>Spherize.

Step 13 : The Spherize dialogue box opens. Click OK.
The Spherize has been applied.

Step 14 : Press CTRL+F twice. This will reapply the Spherize twice. Press CTRL+D to deselect.

Step 15 : Press SHIFT and click on Layer1. Both layers are highlighted.

Step 16 : Press CTRL+E. Both the layers combine into Layer 2.

Step 17 : Press CTRL+A. A selections forms around the edge of the image.

Step 18 : Press v (MoveTool). Click on the 2nd and 5th icons in the top panel.

As soon as you press the circle moves to the exact centre of the canvas.

Step 19 : Click the Rulers. In CS5 it is found here in the top panel. In other versions go to Window in he top panel. You will find rulers under it.

Step 20 : Drag from the rulers to being down a guide from the top midway in the circle.

Step 21 : Drag a guide from the side and position it in the middle.

Step 22 : Click the Horizontal Type Tool.

Step 23 : Click in the top panel to bring up the list of Fonts. Click on Impact. It is available in all versions of Photoshop. Set the Font size at the right.

Step 24 : Type in 12.

Step 25 : Click the Tick Mark in the top panel.

Step 26 : Press v (Move Tool). Move the numeral in position using the Arrow Keys on the keyboard.

Step 27 : Press CTRL+J. To duplicate the layer.

Step 28 : Press SHIFT and drag down the duplicate layer to the bottom.

Step 29 : Double click on the Text thumbnail on 12 copy.

As soon as you double click the 12 is highlighted in black.

Step 30 : Type in 6.

Step 31 : Click the Tick Mark in the top panel.

Step 32 : Use the arrow keys to move the six in position. Use the left and up arrows.

Step 33 : Press CTRL+J. Layer 6 duplicates into 6 copy.

Step 34 : Press v and move the 6 into where 9 on the clock face should be. Use the arrow keys if needed.

Step 35 : Double click the layer thumbnail on 6 copy.

The 6 is highlighted.

Step 36 : Type 9.

Step 37 : Click the Tick Mark. Use the arrow keys if necessary.

Step 38 : Press CTRL+J. 9 copy layer forms.

Step 39 : Press SHIFT and move the 9 to the right where 3 should be.

Step 40 : Double click the layer thumbnail on 9 copy.

The 9 is highlighted.

Step 41 : Type in 3.

Step 42 : Click the Tick Mark.

Step 43 : Move the guide back to the ruler at the top.

Step 44 : Move the other guide to the ruler at the left.

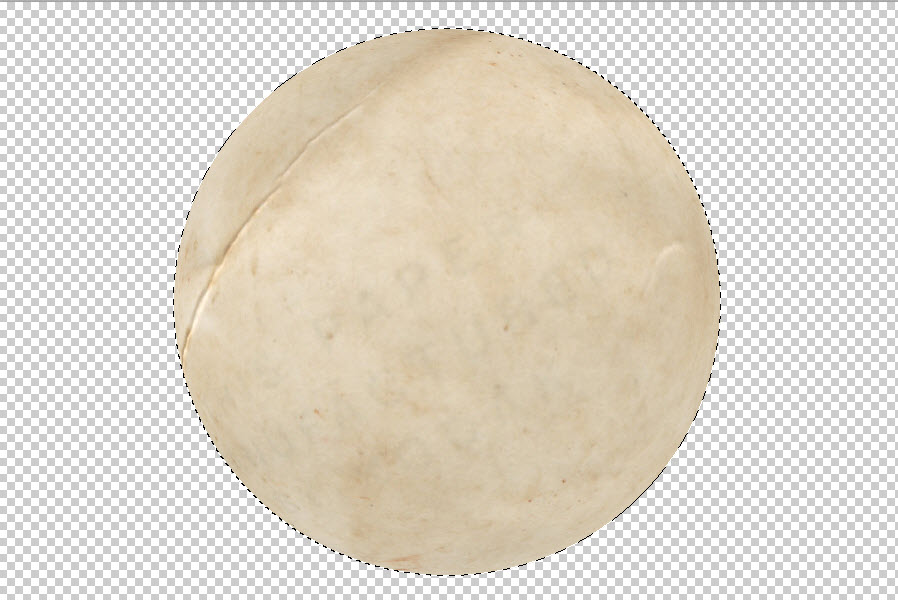
The clock face looks like this.

Step 45 : Click the New Layer icon. A new Layer 3 forms.

Step 46 : Click the Pen Tool.

At the top Paths should be selected. If it is not click the second icon which is Paths.

Step 46 : Use the Pen Tool to make one of the hands.

Step 47 : Click on the Paths palette. Click on Fill Path.

The Foreground/Background colors should be set to Black/White.

Step 48 : The Fill Color dialogue box opens. Set the Use to Foreground Color.

Step 49 : The hand is filled with Black. The Path stills remains.
Step 50 : Click anywhere below the work path, the Path goes away.

The Path has gone away.

Step 51 : Click back on the Layers palette.

Step 52 : Press CTRL+J. Layer 3 duplicates into Layer 3 copy.

Step 53 : Press CTRL+T. A selection forms.

Step 54 : Right click inside the selection. From the pop up click on Rotate 90 degree CW.

The selection flips 90 degree.

Step 55 : Click inside the selections and drag down.

Step 56 : Hover the cursor n a corner. A small bent two headed arrow appears. You can rotate the selection with it.

Step 57 : Push up the the selection to shorten the second hand.

Step 58 : Press v. Use the arrow keys to position the hand correctly.

Step 59 : Press SHIFT. Click on 12 (layer). All the layers are highlighted.
Step 60 : Press CTRL+E. All the layers combine into Layer 3 copy.

Step 61 : Click on the Add Layer Style button. Click on Drop Shadow.

Step 62 : Click to set the color of the shadow.

Step 63 : The Select Shadow Color dialogue box opens. It is the same as the Color Picker.

Step 64 : With the Set shadow color open click on the clock face. The color is immediately selected in the color picker. The 'new' at the top changes to the color selected.

Step 65 : Click on a darker shade. The shade chosen has a numerical value. It can be seen at the bottom -- 625035. Click OK in the Color Picker.

Step 66 : With the Drop Shadow dialogue box open place the cursor on the clock face and drag. You will be able to move the drop shadow in any direction.
Click OK When satisfied.

Step 67 : I have given the settings for the Size and Distance and lastly reduced the Opacity to 65%. There is nothing hard and fast about this. The rule of the thumb should be that the shadow looks like one and is not sharp. Click OK in the Drop Shadow.

The clock face looks like this.

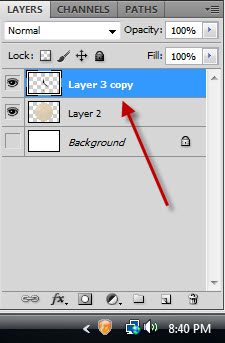
Step 68 : Press SHIFT and click on Layer 2.

Step 69 : Press CTRL+E. The two layers combine into Layer 3 copy.
Turn on the eye icon of the Background Layer.

This is how the clock face looks.

Step 70 : CTRL+CLICK the Layer 3 copy.

Step 71 : A selection forms around the clock face as soon as you CTRL+CLICK.

Step 72 : Go to Filter>Distort>Spherize.

Step 73 : The Spherize dialogue box opens. I have set the amount at 35%. Click OK.

The clock face looks like this.

Step 74 : Click the layer Style button and click on Inner Shadow.

Step 75 : I have set the Size quite high at 185, Choke 25 and Distance at 10 pixels.Click OK.

The completed clock face. If you want only the clock face you can stop here. Otherwise you can carry on.
PART 2

Step 76 : Press CTRL+T. A selection forms.

Step 77 : Press CTRL+SHIFT+ALT. Drag the top left corner inwards. Both corners will shift inwards proportionately.

Step 78 : Now press CTRL+T and drag the middle handle straight down.

Step 79 : Press ENTER. The selection disappears.

Step 80 : Press CTRL+T. Drag left or right middle handle outwards and the top middle handle up. The clock face will increase in size proportionately. Click ENTER.

Step 81 : Press CTRL+A. A selection forms all around the image.

Step 82 : In the top panel click on the second and fifth icons.

Step 83 : The clock face has moved to the dead centre. Press CTRL+D to deselect.

Step 84 : After deselecting, press SHIFT and drag the clock face down a bit towards the bottom.

Step 85 : Click on Effects below Layer 3 copy. The Layer Style dialogue box opens.

Step 86 : Click on Drop Shadow. The interface changes to Drop Shadow.

Step 87 : Place you cursor on the image and you will be able to move the Drop Shadow as you want.
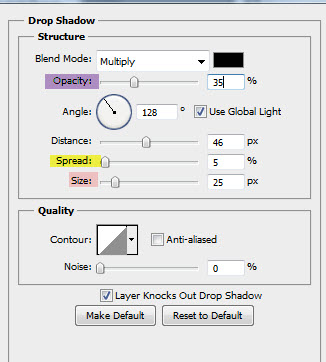
Step 88 : I have set the Size at 25, Spread at 5 and lastly reduced the Opacity to 35. Distance has already been set at 46 when I dragged the Drop Shadow.
Click OK.

The image looks like this.

We will now use some brushes that need to be downloaded. These are free brushes. You will find the Brushes here
You will need to register to download the Brush Pack. Registration is free.
Download the Brush to a folder on your computer.

I have downloaded the Brush which is in a zip file.

Right click the file and click on Extract Here.

I have extracted the Brush. Remember where you have kept your brush. I will show you an easy way to load it.

Step 89 : Before using the Brush. Click the new layer icon and a new Layer 1 forms.

Step 90 : Minimize the image in Photoshop. Bring up the folder where you downloaded the Brush.

Step 91 : Drag the Brush to the gray background in Photoshop. A sign appears below the Brush + Copy. Release it. It will be installed automatically.

Step 92 : Press b to bring up the Brush Tool. Click in the top panel where the arrow points to reveal the Brushes.

Step 93 : Scroll to the bottom. You will find the Brushes in the bottom layer.

Step 94 : I have clicked on a Brush.

Step 95 : The Brush is a very large one. Press [ (left bracket) to reduce the size of the Brush.

Step 96 : Click once with the Brush.

The Brush is on Layer 1. All Brushes should be on a new layer. The advantage of this is if you do not like a Brush. You can simply delete it without affecting the rest of the composition.

Step 97 : Ctrl+CLICK the layer thumbnail on Layer1.

Step 98 : a selection forms around the Brush.

Step 99 : Click the Gradient Tool.

Step 100 : The image looks like this. Press CTRL+D to deselect.

Step 101 ; Click on Drop Shadow under Layer 3 copy.

Step 102. Right click effects and click on Copy layer style.

Step 103 : Right click on Layer 1 and click on Paste Layer Style.

The Drop Shadow has been added.

Step 104 : Click on Horizontal Type Tool.

Step 105 : Draw out the Text Box.

Step 106 : I have types out my Text.

Step 107 : Click the Tick Mark in the top panel.

Step 108 : Right click the Text layer. Click on Rasterize Test.

Step 109 : CTRL+CLICK the layer thumbnail on the Text Layer. The Text has been razterised.

Step 110 : Press DELETE. Only the outline of the letters remain.

Step 111 : Click the Foreground Color.

Step 112 : Clicking the Foreground Color brings up the Color Picker. Now click on a light shade on the clock face. The color is immediately selected in the color picker. Click OK.

Step 113 : Now click on the Background Color.

Step 114 : The Color Picker opens. Click on a darker shade. It is instantly selected in the Color picker. Click OK.

The Foreground/background Colors have been changed. (To restore it later press x and d on the keyboard).

Step 115 : Click the Gradient Tool or just press g on the keyboard.

Step 116 : Press diagonally with the Gradient Tool.

Step 117 : Press v (Move Tool). Press SHIFT and drag the Text straight down.

Step 118 : Right click the Text layer. Click on Paste layer Style.

This is how the Text looks

Step 119 : Press g (Gradient Tool). Press SHIFT. Drag straight up.

This is how the image looks.

Step 120 : CTRL+CLICK on Layer thumbnail on Layer1.

Step 121 : The dancer is selected by marching ants.

Step 122 : Press g (Gradient Tool). Drag down from bottom to top.

This is how the image looks.

Step 123 : Press ALT and double click the Background. It changes to Layer0.

Step 124 : Click the Layer Style button. Click on Inner Shadow.

Step 125 : In the Inner Shadow, I have set the Size at 200, Choke at 10 and Distance at 25. Click OK.

The image looks like this.

Step 126 : Click on Layer 1.

Step 127 : Click on Effects below Layer1.

Step 128 : In the Layer Style click on Stroke. Change the fill type to Gradient.

Step 129 : Click to bring up the Gradient Editor.

Step 130 : Click on the Yellow, Violet, Orange, Blue Gradient. Click OK. Click OK in Layer Styles.

The finished image.
Other Photoshop tutorials are here


