


Christmas is a couple of week away. This is the season to be jolly. How about making a simple personalized Christmas Card that you can send to friends? So let's get started. Let us first create an ornament. You should be able to do it in any version of Photoshop.

Step 1 : Open a New document. You can name it Christmas Card if you wish. Set the Resolution to 300 pixels if you wish to print it, otherwise you can set a much lower resolution even 71 pixels. The Color Mode should be RGB and Background Contents White. Click OK.

Step 2 : The document opens. It is the Background Layer. Click the New Layer icon and Layer 1 forms.

Step 3 : Click the Elliptical Marquee.

Step 4 : Press SHIFT and you will be able to draw out a perfect circle with the Marquee Tool.

Step 5 : Click the Foreground Color to bring up the Color Picker.

Step 6 : Type in FF0000 at the bottom of the Color Picker for a bright shade of Red. The Red will automatically be selected as soon as you type the value. Click OK in the Color Picker.

Step 7 : The Foreground Color changes to the Color picked as soon as you click OK.

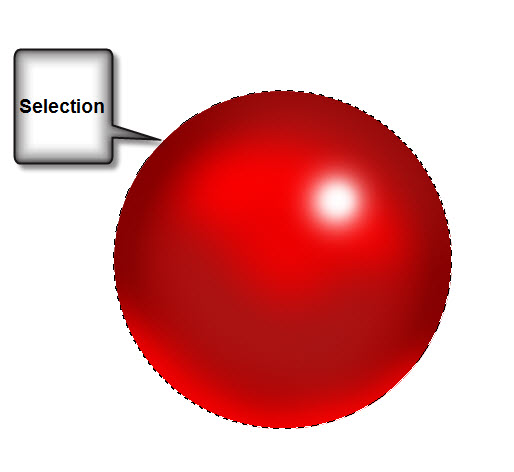
Step 8 : Press ALT+BACKSPACE to fill with the Foreground Color which in this case is the bright shade of Red.

Step 9 : Double Click Layer1 to bring up the Blending Options dialogue box.

Step 10 : Click Inner Glow.

Step 11 : Click the small color square in Inner Glow to bring up the Color Picker dialogue box. Type 000000 at the bottom for Black. Click OK in the Color Picker.

Step 12 : Change the Blend Mode to Normal from Screen.
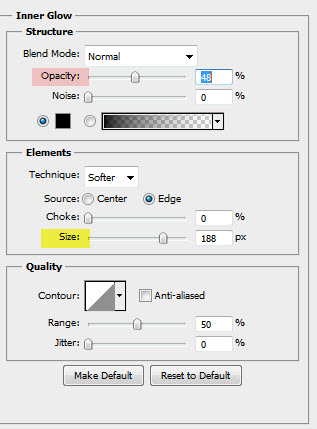
Step 13 : In the Inner Glow dialogue box first increase the size considerably. Next drop the Opacity down. You do not have to give the exact values I have given. Give your own. Set the size quite high, then reduce the opacity.

My image looks like this. Click OK in the Inner Glow dialogue box.

Step 14 : Click the New Layer button and a new Layer2 forms.

Step 15 : Change the Blend Mode to Color Dodge.


Step 25 : Click the Foreground Color. The Color Picker comes up. Click on a darker shade of red. Click OK in the color picker. The shade I have chosen is a51616. Click OK in the Color Picker.

Step 26 : With the Brush paint a shadow in the bottom half and near the edge of the circle as shown.
 Step 27 : Again click on Gaussian Blur.

Step 28 : The Gaussian Blur dialogue box comes up again. Drag the slider to blur the shadow.
 Step 29 : Click the New Layer icon. A new Layer 4 forms.
 Step 30 : Press and then d o reset the Foreground/Background color to Black/White.
 Step 31 : Press x. The Foreground Color switches to White.
 Step 32 : Click once with the Brush.
 Step 33 : Go to Filter>Blur>Gaussian Blur.
 Step 34 : The Gaussian dialogue box opens. Blur the white highlight considerably.
 Step 35 : Click the New Layer icon. A new Layer 5 forms.
 Step 36 : Make the Brush a bit small and click on the highlight.
 Step 37 : Go to Filter>Blur>Gaussian Blur.
 Step 38 : When the Gaussian Blur dialogue box comes up, give a lesser blur this time.
 Step 39 : Click the New Layer icon. A new layer 6 forms.
 Step 40 : Make the brush smaller. Click once.
 Step 41 : Again click on Gaussian Blur
 Step 42 : Give a slight blur this time and click OK.
 Step 43 : This is how the Layers palette looks.
 Step 44 : Press SHIFT. Click on Layer4. All the three layers are highlighted.
 Step 45 : Press CTRL+E. All the three layers are compressed into one -- Layer6.

Step 26 : With the Brush paint a shadow in the bottom half and near the edge of the circle as shown.

Step 28 : The Gaussian Blur dialogue box comes up again. Drag the slider to blur the shadow.


All the while you were working, the selection of marching ants remain.
 Step 46 : Press CTRL+D to deselect. The selection of marching ants go away.
 Step 47 : Click the New Layer icon. A new layer 7 forms.
 Step 48 : Click the Zoom Tool. Click the icon marked with a plus in the top panel to zoom into the image.


Step 49 : Click on the Foreground Color. It brings up the Color Picker. Click on yellow in the Spectrum in the middle. Click a shade of yellow. Click OK in Color Picker.
 Step 50 : The Foreground Color changes to color picked.

Step 51 : Click the Rounded Rectangle Tool.
 Step 52 : In the top panel I have left the Radius at the default 10 pixel.
 Step 53 : Draw as shown with the Rectangular Marquee Tool.
 Step 54 : This is how the Layers palette looks.
 Step 55 : Right Click the Shape1 layer. Click on Rasterize Layer.
 Step 56 : Shape 1 Layer has been Rasterized.


Step 57 : Click the Rectangular Marquee Tool
 Step 58 : Draw a selection as shown.
 Step 59 : Press DELETE. The bottom is deleted.
 Step 60 : Press CTRL+D to deselect.
 Step 61 : Press CTRL+T. A selection forms.
 Step 62 : Use the up and left and right arrow keys to position the yellow block correctly.
 Step 63 : Right click in the middle and click on Warp from the pop up.
 Step 64 : This grid appears. Pull the handles at the bottom gently till the bottom of the yellow square appears a bit rounded.
 Step 65 : Press ENTER. The image looks like this.
 Step 66 : Press CTRL+T. A selection formed. Right click inside and from the popup click on Perspective.
 Step 67 : Press SHIFT+ALT. Grab either of the top corner handles and drag inwards slightly.
Press ENTER.
 Step 68 : Right click the Shape1 layer. From the pop up click on Blending Options.
 Step 69 : In the Blending Options click on Gradient Overlay.
 Step 70 : Click the Gradient. It opens the Gradient editor.
 Step 71 : Click the Gradient shown by the small white hand. Click OK in the Gradient Editor.
 Step 72 : Change the Angle of the Gradient to 178.
 Step 73 : Change the Blend Mode to Multiply. Click Ok.
 The ornament looks like this so far.
 Step 74 : Right click the Shape 1 layer. Click on Copy layer Style.
 Step 75 : Press CTRL. Click on the New Layer icon. A new Layer 7 forms under Shape 1 layer.
 Step 76 : Click the Rounded Rectangular Tool.
 .Step 77 : Draw a selection as shown.
 Step 78 : Right click the Shape 2 layer. Click Rasterize Layer.
 The Shape 2 Layer has been Rasterized.
 Step 79 : Ctrl+CLICK the layer thumbnail on Shape 2 Layer.
 Step 80 : A selection of marching ants forms.
 Step 81 : Go to Select>Modify>Contract.
 Step 82 : In the Contract Selection dialogue box set Contract By at 4 pixels. Click OK.
 Step 83 : The selection looks like this.
 Step 84 : Press delete. Press CTRL+D to deselect.
 Step 85 : Press CTRL+T. A selection forms. Use the right and left arrow keys to centre the handle of he ornament, for that's what it is. Then press enter.
 Step 86 : Click on Shape 1 Layer.
 Step 87 : Right click and click on Copy Layer Style.
 Step 88 : Click on Shape 2 layer.
 Step 89 : Right click Shape 2 layer and click on Paste Layer Style.
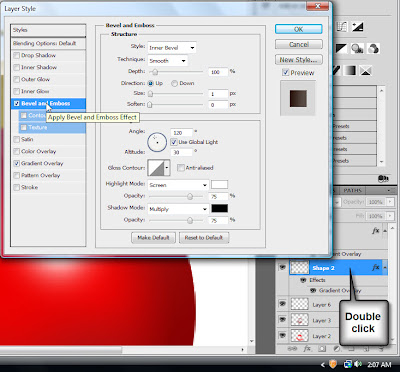 Step 90 : Double click the Shape 2 layer. It will bring up the Blending Options dialogue box. Click on Bevel and Emboss.
 Step 91 : I have increased the Size just a bit.
 Step 92 : Click on Gradient Overlay. I have increased the Angle a wee bit. Click OK..
 This is how the image looks so far.
 Step 93 : CTRL+CLICK the layer thumbnail on Shape 1 layer.
 Step 94 : A selection of marching ants appear.
 Step 95 : Click on the Shape 1 layer.
 Step 96 : Click on the New Layer icon. A new Layer 7 forms.
 Step 97 : Press x and then d to set the Foreground/Background to the default Black/White. Click the Gradient Tool.
 Step 98 : Press SHIFT and drag straight up till a little below the midway point with the Gradient Tool.
 The image looks like this.
 Step 99 : Decrease the Opacity to 75%. Press CTRL+D to deselect.
 Step 100 : Press CTRL+Click the New Layer icon. A new Layer 8 forms under Layer 7.
 Step 101 : Change the Blend Mode to Color. Drop the Opacity to 30%.

Step 102 : Click the Brush Tool.

Step 103 : Paint just below the handle.
 Step 104 : Go to Filter>Blur>Gaussian Blur.
 Step 105 : The Gaussian Blur dialogue box comes up. I have set a Radius of 4.6. Click OK.
 Step 106 : CTRL+CLICK the layer thumbnail on Layer1. Note I have not selected the Layer, otherwise it would have been highlighted.
 Step 107 : A selection forms immediately.
 Step 108 : Press CTRL+SHIFT+I to reverse the selection. Press DELETE.
 The completed ornament.
 We now need some free Brushes. You will find them here
It belongs to Scully7491
Download them in a folder on your computer. It is a rar file. If you do not have Winrar you can down a trial version which will do the job. You will find it here
 Right click the Rar file in the folder you have downloaded the Brush. Click on Extract here.

The Brush has been extracted, It is an abr file. Leave it in the folder.
 Press b to bring up the brush Tool. Click in the top panel to reveal the Brush controls. Next click on the tiny black arrow at right. A drop down list will appear. Click on Load Brushes.
 Navigate to the folder where you have kept your Brush on your computer. Click on the Brush to load it into photoshop.
 If you scroll to the bottom of Brush controls. You will find the Brushes.
 Step109. Click on the Background Layer.
 Step 110. Click on the New Layer icon. A new Layer 9 forms.
 Step 111 Click on the Foreground Color. The Color Picker comes up. Click on a green in the Spectrum. Click a shade of green. Click OK in Color Picker.
 Step 112 :I have clicked on Brush 1024.
 Step 113 : You can see the Brush. It is a bit large.
 Step 114 : Press [ (left bracket) to make the Brush smaller.
 Step 115 : Click once with the Brush.
 Step 116 : Click the New Layer icon. A new Layer 10 forms.

Step 117 : Click the Foreground Color. The Color Picker comes up. Click on Orange in the Spectrum.
Click on a Brown Shade. Click OK in Color Picker.
 Step 118 : Click in the Brush Controls at the top. I have selected another Brush.
 Step 119 : I have clicked once with the Brush.
 The image looks like this.
 Step 120 : Click the New Layer icon. A new Layer 11 forms.
 Step 121 : Click the Foreground Color. The Color Picker comes up. I have clicked on Purple. Then clicked on a shade of purple. Click OK in the Color Picker.
 Step 122 : I have clicked on another Brush.
 Step 123 : I have clicked once with the Brush. I am making a new layer for each Brush. This is because, if I do not like a particular effect with a Brush later, I can just delete the layer without affecting the rest of the Composition.
 Step 124 : Click the New layer Icon. A new Layer 12 forms.

Step 125 : Click the Foreground Color. The Color Picker comes up. Click on a Red, then a shade. I think you should have got the hang of it now.
 Step 126 : I have clicked on another Brush.
 Step 127 : I have clicked once with the Brush.
 Step 128 : Click on the topmost layer.
 Step 129 : Click on the Horizontal Type Tool.
 Step 130 : The Font Color in the top panel is set to Black. It will not matter though as you will see.

Step 131 : Click in the top panel to see the Fonts in your version of Photoshop. Set the Size by typing in a value.

Step 132 : I am choosing Impact. It is found in all versions of Photoshop.
 Step 133 : Draw out the Text Box with the Type Tool.
 Step 134 : I have typed out my Text.
 Step 135 : Click on Styles.
 Step 136 : The Styles dialogue box opens.
 Step 137 : You will find even more styles if you click the tiny black arrow at the top right of the Styles dialogue box.
 Step 138 : I have clicked on one of the Styles.
 Step 139 : This is how the Text looks. You can use any Style you want to.
 Step 140 : Click the Foreground Color. The Color Picker comes up. Hover the the cursor over any part of the image and click. The color will be selected. Click OK in Color Picker.
 Step 141 : The Foreground Color changes to color picked.
 Step 142 : Click on the background Layer first. Click on the New Layer icon. A new Layer 13 forms over the Background.
 Step 143 : The Layer is filled with chosen color.
 The image looks like this.
 Step 144 : Go to Filter>Texture>Texturiser.
 Step 145 : The Texturiser dialogue box opens.
 Step 146 : At the controls on the top right change the Texture to Sandstone. Click OK.
 The image looks like this with the Texture added.
 Step 147 : Go to Filter>Render>Lighting effects.
 Step 148 : The Lighting Effects dialogue box opens. Just click OK.
 Step 149 : Go to Edit>Fade Lighting Effects.
 Step 150 : In the Fade dialogue box reduce the Opacity to 40%. Click OK.
 The image looks like this.
 Step 151 : Click on Layer 1.
 Step 152 : Press SHIFT and click on Layer7. All the layers in between are highlighted.
 Step 153 : All the highlighted layer are merged into Layer7.
 Step 154 : Press CTRL+J. Layer 7 duplicates into Layer 7 copy.
 Step 155 : Click the Move Tool.
 Step 156 : Move the layer to a different position in the image.
 Step 157 : Press CTRL+T. A selection forms around the second ornament.
 Step 158 : Press SHIFT+ALT. Drag the top corner handle down and drag diagonally down to resize the selection proportionately.
Click ENTER.
 Step 159 : Press CTRL+U. The Hue/Saturation dialogue box opens. Drag the Hue slider to change the Color. Do not touch Saturation and Lightness.
 This is how the second ornament looks like.
 Step 160 : Press CTRL+J. Layer 7 copy 2 forms.
 Step 161 : Use the Move Tool to shift the layer to another position. Press CTRL+T. A selection forms. Press SHIFT+ALT to resize proportionately. You can make the ornament bigger or smaller. Press Enter.
 Step 162 : Press CTRL+U to bring up Hue/Saturation. Drag the Hue slider to change the color of the ornament. Click OK.
 This is how the image looks.
 Step 163 : Click Layer 7 copy 2.
 Step 164 : Drag Layer 7 copy 2 below Layer 7.
 This is how the image looks.
 Step 165 : Double click on Layer 7 copy 2 to bring up the Blending options.
 Step 166 : Click on Drop Shadow. I have set the Distance at 10, Size at 10, Spread at four and lastly lowered the Opacity to 50% in that order. Click OK.
 Step 167 : Right click Layer 7 copy2. From the pop up click on Copy Layer Style.
 Step 168 : Now right click on Layer 7 and from the pop up click on Paste Layer Style.
 Step 169 : Right click Layer 7 copy. Click on Paste layer Style.
 The finished Christmas Card.
Other photoshop tutorials are here


Press ENTER.


Step 102 : Click the Brush Tool.

Step 103 : Paint just below the handle.


It belongs to Scully7491
Download them in a folder on your computer. It is a rar file. If you do not have Winrar you can down a trial version which will do the job. You will find it here
The Brush has been extracted, It is an abr file. Leave it in the folder.


Step 117 : Click the Foreground Color. The Color Picker comes up. Click on Orange in the Spectrum.
Click on a Brown Shade. Click OK in Color Picker.


Step 125 : Click the Foreground Color. The Color Picker comes up. Click on a Red, then a shade. I think you should have got the hang of it now.

Step 131 : Click in the top panel to see the Fonts in your version of Photoshop. Set the Size by typing in a value.
Step 132 : I am choosing Impact. It is found in all versions of Photoshop.


Click ENTER.


Other photoshop tutorials are here


