


The Extract Filter is very handy to cut out images from background. You may have seen tutorials on it which teaches this. But what is not given in such tutorials is that there are some problems in using Extract. It leaves behind jagged edges and may remove portions you did not want removed and kept portions which you do not want. Let me show you how to use the Extract Tool properly to extract an image perfectly from its background.. It can be done in any version of Photoshop.
We will first need a free stock image for this.

I have opened this hight resolution free stock image in Photoshop. You will find it here


Step 1 : Press CTRL+J. The Layer 0 duplicates into Layer 0 copy. Click off the eye icon in the Layer 0.

Step 2 : Go to Filter>Extract.

Step 3 : The Extract Filter dialogue box opens.

Step 4 : Check the Smart Highlighting option in the panel at the right. (The Extract Filter dialogue box may look a bit different in your version. I am using PS CS 5 which does not have the Extract Tool. I have had to download and install it from Adobe).
 You can also leave Smart Highlighting off. It will not be a problem in the extraction.

Step 5 : Click the Edge Highlighter Tool.

Step 6 : Click the Zoom Tool (in the Extract dialogue box)

Step 7 : Draw a selection around a portion of the image to zoom into with the Zoom Tool.

Step 8 : I have zoomed into the image.

Step 9 : Click again on the Edge Highlighter Tool.

Step 10 : Select from where you will begin highlighting with the Edge Highlighter.

Step 11 : Since the Smart Highlighting is turned on (Step 3), a thin highlight will be applied. If it is not turned on, the line will be thicker.

Step 12 : It will take some time to go around the image with the Highlighter. Mistakes can also happen. I have gone away from the edge of the boot with the Highlighter. That has to be corrected before proceeding further.

Step 13 : Click the Erazer Tool.

Step 14 : Eraze the portion where the Highlighter went off from the edge.

Step 15 : Click again on the Edge Highlighter to continue.

Step 16 : Since you have zoomed into the image, you will have to use the Hand Tool to scroll up and down and sideways with it. You can do it with the Space Bar.

Step 17 : Use the Hand Tool to scroll down the image.

Step 18 : You will have to click the Edge Highlighter again to continue.

Step 19 : The highlighting is complete.

Step 20 : Click the Fill Tool. And click inside the selection.
 Clicking inside the selection with the Fill Tool, fills the selection with color. Click OK in the Extract dialogue box.


Step 21 : The image has been extracted.

The Layer palette looks like this after the extraction.

Step 22 : Click on the Background Layer. Turn on the eye icon.

Step 23 : Press CTRL+J to duplicate Layer 0. A Layer 0 copy 2 forms. Turn of the eye icon in Layer 0.

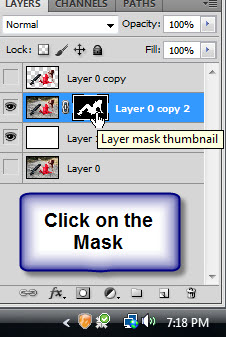
Step 24 : CTRL+CLICK the Layer thumbnail of Layer 0 copy.

Step 25 : As soon as you CTRL+CLICK a selection of marching ants selects the extracted portion.

Step 26 : Click off the eye icon on Layer 0 copy.

Step 27 : Click the Layer Mask button and a Layer Mask forms next to the layer thumbnail on Layer 0 copy2.

The image looks like this.

Step 28 : ALT+CLICK the Mask to see the Mask.

Now you can see the Mask itself. Ther are jagged edges.

Step 29 : ALT+CLICK the Mask again.

The extracted image is visible again.

Step 30 : Now click on the Layer thumbnail on Layer 0 copy2.

Step 31 : Zoom into the image.

Step 32 : Click again on the Mask.

Step 33 : Make sure that the Foreground/Background is set to Black/White. If it is not press x and then d on the keyboard.

Step 34 : Click the Brush Tool.

Step 35 : In the top panel panel click to reveal the Brush Controls. Set the Hardness to 100%. You can increase the size of the Brush by pressing ] (right bracket key) and decrease it by pressing [ (left bracket key).

Step 36 : Paint away the bits and pieces left behind during extraction.

Step 37 : Press x on the keyboard or use the small bent arrow to switch the Foreground Color to White.

Step 38 : With White as Background paint in details that have not been properly extracted. This is what you must do. Paint with Black as Foreground Color to remove details that you do not want and paint with White as Foreground color for details you wish to include.

Step 39 : Use the SPACE BAR which will bring up the Hand Tool to scroll the image up and down.

Step 40 : You can see here that the edge here has not been properly extracted.
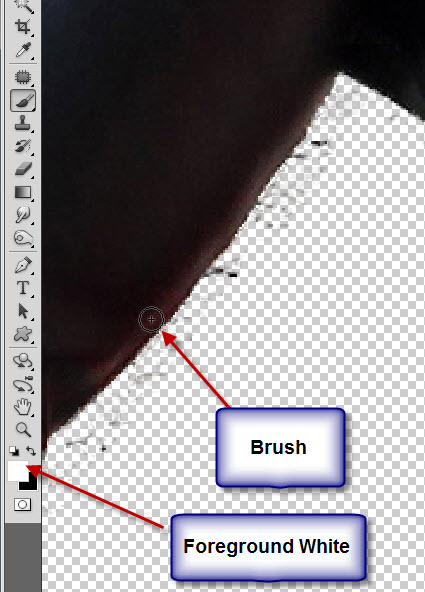
Step 41 : With the Foreground set to White I have painted back the protion.

Step 42 : With the Foreground Color set to Black I have painted away the bits and pieces that were extracted (see above) with the image.

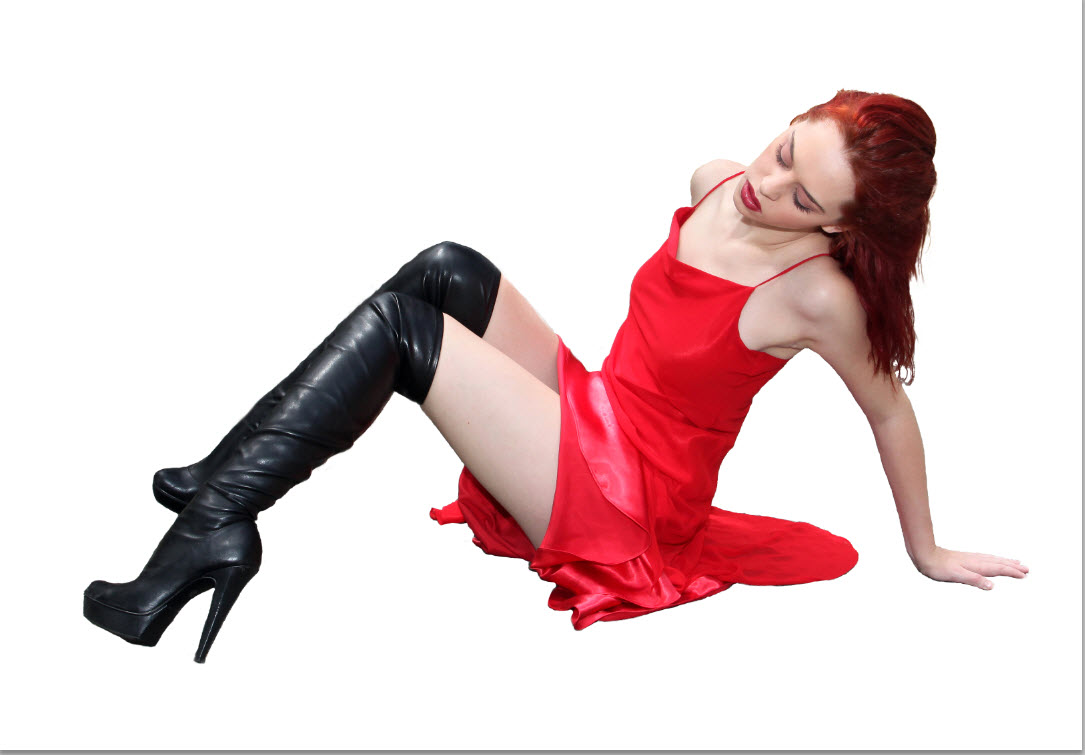
This is how the image looks after completion.

Step 43 : Press CTRL and click the new layer icon. A new Layer1 forms below Layer0 copy 2.


This is how the image looks.
Step45 : Click on the Mask on Layer 0 copy2.
 Step 46 : Now ALT+CLICK the layer mask.
 Step 47 : You can now see the Mask itself. ALT+CLICK to exit the Mask.
 Step 48 : Press CTRL+L to bring up the Levels dialogue box.
 Step 49 : Now drag the Black slider, White slider and the the Gray slider in the middle keeping a watch on your image. The edges will sharpen as you pull the sliders suitably. Click OK.
 Step 50 : Click the Blur Tool.
 Step 51 : The Blur Tool behaves just like a Brush. To enlarge the Brush use the ] (right bracket). Use a fairly large Brush as shown.

Step45 : Click on the Mask on Layer 0 copy2.

Step 52 : In the top panel set the strength of the Blur Tool to 25%. Nothing hard and fast about it. It will depend on your image.
 Step 53 : Blur parts like hair, not the the entire edge.
 Step 54 : Click the Brush Tool again.
 Step 55 : Zoom into the image. You can see that some portions need to be tidied up. With the Brush Tool painting with Black as Foreground Color remove the bits and pieces visible.
 Step 56 : The bits and pieces have been removed from around the image.
 Step 57 : Click on Layer1.
 Step 58 : I will now insert this free stock image in the background. You will find it here
It belongs to *somadjinn
 Step 59 : Press ALT+A (Select ALL). Marching ants select the image. Press CTRL+C (Copy)
 Step 60 : Click on this image and press CTRL+V (Paste). The image has been pasted.
 Step 61 : It has been pasted just above Layer1 which was filled with White earlier.

Step 62 : Press CTRL+T. A selection forms.
 Step 63 : Press SHIFT+ALT and drag the top corner handle up. It will increase the size of the image proportionately.
 Step 64 : Drag till the image covers the entire white layer. Press Enter.
 Step 65 : Click on the Layer Mask on layer 0 copy 2.
 Step 66 : Click the Gradient Tool. The Foreground/Background should be Black/White. Click on top to bring up the Gradient Editor.
 Step 67 : Click the Preset shown. Click OK in Gradient Editor.
 Step 68 : Keeping SHIFT pressed drag the Gradient Tool about 3/th to the top.
 Step 69 : Drag the Opacity of the layer down to 70%.
 The finished image.
Other photoshop tutorials are here


It belongs to *somadjinn


Step 62 : Press CTRL+T. A selection forms.


Other photoshop tutorials are here


