Step 1 : Open a New document.
Step 2 : Press CTRL+I to change the White document to Black.
Step 3 : Click the Custom Shape Tool.
Step 4 : Click in the top panel to see the Custom Shapes.
To see other Shapes, click on the small black arrow at right. Clicking on each brings up a set of Custom Shapes. You can use anyone you wish.
I will use one of these free Custom Shapes. You can download them
hereDownload them to a folder on your computer.
Step 5 : Click on Load Shapes.
Step 6 : Navigate to the folder where you have downloaded the Shape. I have navigated to mine. Click on the Custom Shape to load it into Photoshop.
Step 7 : If you scroll down to the bottom in the top panel, you will find the Shapes.
Step 8 : I have clicked on the Elvis Shape.
Step 9 : Drag out the Shape.
Step 10 : Click the Layer Styles button.
The Layer Styles dialogue box opens.
Step 11 : Reduce the Fill Opacity to 0.
Step 12 : Click on Drop Shadow. Lower the Opacity to 40. Reduce the Distance and size to 3.
Step 13 : Click the Gradient. .
Step 14 : In the Gradient Editor which opens click on the first Preset -- Foreground to Background.
Step 15 : Click to add a new Stop approximately where shown.
Step 16 : Click to add three more stops. There are now five stops in all.
Step 17 : Click the first Stop. The Color which was grayed out becomes Black.
Step 18 : Now click the Color to change the Color.
Step 19 : The Select stop color dialogue box opens. Click to select a dark gray. The 'new' at the top immediately shows you the color picked. Click OK.
The Color of the Stop changes to dark gray.
Step 20 : Click on the second Stop. Click the Color.
Step 21 : Click on a light gray in the Select Stop Color. Click OK.
Step 22 : Click the third Stop and click on Color.
Step 23 : In the select Stop Color click a medium gray. Click OK.
Step 24 : Click the fourth Stop. Click on Color.
Step 25 : Click on White in the select Stop Color. Click OK.
Step 26 : Click the last Stop and click on Color.
Step 27 : Click on a light gray in Select Stop Color and click OK..
Step 28 : Give a name to the Gradient. I have named it Metal. Click on New.
Step 29 : You can see the Gradient. It is the last one in the Preset. Click OK.
Step 30 : In the Gradient Overly reduce the Scale to 50%. (This is not hard and fast. It will depend on your image. All subsequent settings can be tweaked by you).
The image looks like this so far.
Step 31 : Next click on Inner Shadow. Lower the Opacity to 25% and increase the Size to 10.
Step 32 : Click next on Inner Glow. Click on Set Color of Glow.
Step 33 : The Color Picker opens. Click on White. Click OK.
Step 34 : Change the Blend Mode to Normal. Increase the Opacity to 100 and Size to 8.
This is how the image looks so far.
Step 35 : Click on Bevel and Emboss. The Style is set to Inner Bevel, Technique to Chisel Hard, Depth to 70, Direction Up, the Opacity of Highlight Mode to 100% and Shadow Mode 50%.
Step 36 : Click directly on the Gloss Counter box. Not on the tiny black arrow beside it.
Step 37 : The Contour Editor comes up.
Step 38 : Drag the bottom of the diagonal at left bottom to the middle. Drag the diagonal from the right top to the middle.
Step 39 : Click the horizontal line and drag up.
Step 40 : Click and drag up and down as shown till you get something like this. Click OK.
Step 41 : Click on the tiny arrow beside the Gloss Counter. It opens the Presets. Click on the tiny black arrow beside the Presets. Click on New Contour.
Step 42 : The Contour name dialogue box opens. I am naming it Metal. Click OK.
Step 43 : Open the Presets of the Gloss Contour You will see the new Metal Gloss Contour.
The image looks like this.
Step 44 : Click now on Satin. Click on the black Color box at the top.
Step 45 : The Select satin color dialogue box opens. Click on white. Click OK.
Step 46 : Change the Blend Mode to Normal. Increase the Opacity to 100. Set the Distance at 15 and Size at 5.
Step 47 : Bring up the Gloss Contour Presets. Click on Cone.
Step 48 : Click on Stroke. Change the Fill Type to Gradient.
Step 49 : Click on the Gradient. Click on Metal in the Presets. Click OK in Gradient Editor.
Step 50 : Change the Angle to 75.
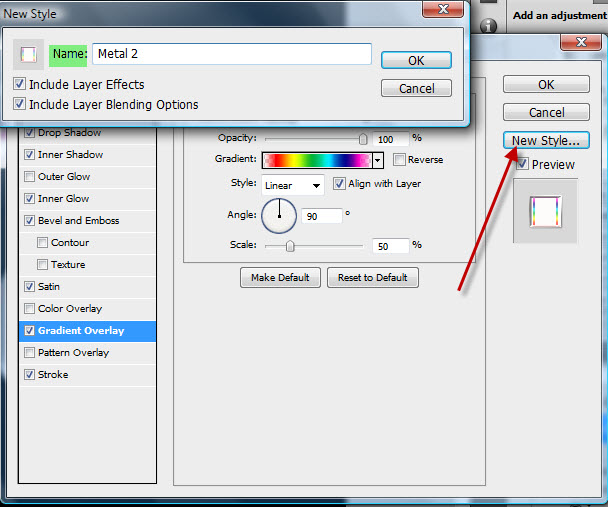
Step 51 : Click on the New Style button.
Step 52 : I have named the New Style Metal. Click OK.
Step 53 : Click on Styles. You can see the Metal Style at the bottom. Click OK.
Step 54 : I have now typed Text on a new document.
Step 55 : Click on the Styles palette. You will find Metal at the bottom. Click it.
The Layer Style has been applied to the Text.
Step 56 : You can tweak the Style a bit further. Click on Gradient Overlay.
Step 57 : Click on the Gradient.
Step 58 : I have clicked on the Transparent Rainbow Preset.
The Style has changed. You can experiment further with other Presets or create your own. I have shown you how.
Step 59 : You can save this as a New Style. I have named it Metals 2.
You can see Metal 2 among the Styles.
Other Photoshop tutorials are
here


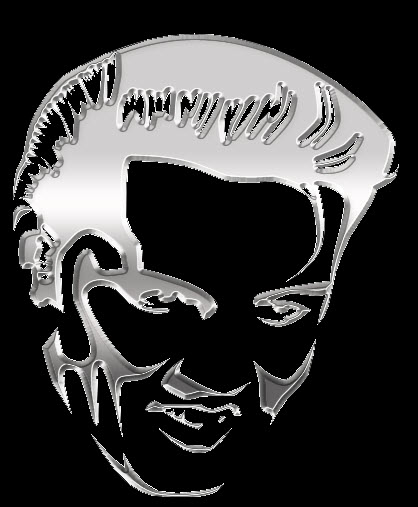

 I will create this Custom Style which can be applied to Text and Custom Shapes.