


The Halftone Pattern is tucked away under Filters in Photoshop. It can be used as a special effect for images. It is not difficult to do. It is the same with Color Halftone. The two create different effects. I will also show you how to add or subtract from selections made with selection tools like the Lasso Tools. This helps to cut out an image from its background.

Step 1 : I will be using this free stock image. You will find it here
It belongs to GABOGRAFICO
So let's begin.

Step 2 : Let us begin the selection process with the Magic Wand.

Step 3 : At the top are four buttons. The second is the Add to Selection.

The third is the Subtract from selection. The first is the New selection and the fourth Intersect with selection.

Step 4 : I have clicked the left portion of the image with the Magic Wand with New selection (first button) in place. Since the background is not uniform, only a part is selected. If you click on another part, another portion will be selected. It will not be possible to select this entire background.

Click the Add to Selection.

You will see a small plus sign below the cursor.

As I am clicking with the Magic wand more and more areas are selected. But some portions are not being selected.

Step 5 : Click another selection tool -- Lasso Tool.

Step 6 : Draw a selection.

The portion has been added to the selection.

Draw another selection with the Lasso.

The marching ants go away.

Step 7 : Click the Subtract from selection icon.

Step 8 : Draw a selection where the marching ants have strayed over the trousers.

The trousers are selected perfectly.

Click the Add to select button or press SHIFT. I have added to the selection by clicking to select the space between the hair.

Press SHIFT and drag with the Lasso to add to the selection. Press ALT and drag with Lasso to subract from the selection. The entire image has been selected.

Step 9 : Press CTRL+SHIFT+I to inverse the selection.

Step 10 : Go to Select>Modify>Feather.

Step 11 : I have set a Feather Radius of 2. Click OK.

Step 12 : Press CTRL+J twice. The Background layer duplicates into Layer1 and Layer 1 copy. Turn off the eye icon of the Background Layer.

Step 13 : Go to Filter>Sketch>Halftone Pattern.

The Halftone Pattern dialogue box opens.

Step 14 : In the controls at the top right, I have set the size at 8, Contrast at 15 and Pattern Type to Dot. click OK.

This is how the image looks.

Step 15 : Change the Blend Mode to Overlay.

The image looks like this.

Step 16 : Click the Layer Mask button. A Layer Mask forms next to the layer thumbnail on Layer 1 copy.

Step 17 : Zoom into the image and click the Brush Tool.

Step 18 : Click in the top panel to reveal the Brush controls. Set the Hardness to 50% to 60%. You can increase the size of the Brush by pressing ] (right square bracket) and decrease it with the [ (left square bracket).

The default colors should be set to Foreground Black/Background White.

Step 19 : With the Brush paint away to remove the Halftone Pattern from the sunglasses.

And the hair.

And the clothes and shoes.

Step 20 : Turn on the eye icon in the Background Layer.

The image looks like this.

Step 21 : I am now opening a document of 4x4 inches.
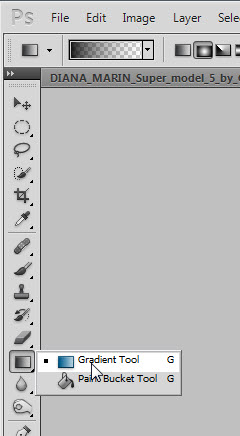
Step 22 : Click the Gradient Tool. At the top you can see Foreground to Transparent is set as the Gradient.

Step 23 : Usually the extreme left Linear Gradient is set as default. we will be using the Radial Gradient next to it.

Step 24 : Drag diagonally upwards with the Gradient Tool. But not absolutely to the top.

Step 25 : You will get a Gradient like this.

We are only working on the Background Layer.

Step 26 : Go to Filter>Pixellate>Color Halftone.

Step 27 : The Color halftone dialogue box opens.

Step 28 : Change the Max Radius to 25 and all the channels to 0.
Click OK.

Step 29 : The image looks like this.

Step 30 : Go to the Channels palette. CTRL+CLICK the layer thumbnail of RGB Channel.

Step 31 : A column of marching ants select the dots and the outward edge.

Step 32 : Press CTRL+SHIFT+I to invert the selection.

Step 33 : Go to Select>Transform Selection.

Step 34 : A selection appears. Press ENTER.

Step 35 : Layer 2 is the dots dragged over to this image. CTRL+CLICK layer thumbnail.

Step 36 : A selection forms. Press DELETE.

Step 37 : Click on the Background Layer.

Step 38 : Click the New layer icon. A new Layer 3 forms above the Background Layer.

Step 39 : Press g on the keyboard (Shortcut for Gradient Tool) and click on the Gradient Editor at the top.

Step 40 : Click on any Gradient. I have clicked on Red, Green Gradient.

Step 41 : Drag diagonally with the Gradient Tool.

Step 42 : This is how the dots look. Press CTRL+D to deselect.

Step 43 : Press v on the keyboard and move the dots around in the image with the cursor.

Step 44 : I have lowered the Opacity of the Layer 3 to 50%.

Step 45 : I have changed the Blend Mode of layer 3 to Difference.

The image looks like this.

Step 46 : Press CTRL+J. Layer 3 copy forms. It duplicates the dots layer.

Step 47 : You can move the duplicated dots to another part of the image.

Step 48 : CTRL+CLICK layer thumbnail of Layer 3 copy.

Step 49 : Press g for Gradient Tool. Click the Gradient editor and select another Gradient. I have clicked on Yellow, Violet, Orange, Blue.

Step 50 : Drag diagonally with the Gradient Tool, but in the opposite direction.

Step 51 : Change the Blend Mode to normal.

Step 52 : The image looks like this. Press CTRL+T. A selection forms.

Step 53 : Drag the middle handles of the selection outwards. Press ENTER.

Step 54 : Lower the Opacity of the layer to 60%.

Step 55. Press v on the keyboard (Move Tool) and move the dots down.

Step 56 : Click on the Background layer.

Step 57 : I will now use this texture. You will find it here
It belongs to

Step 58 : Press v for the Move Tool and move the texture to the image.

The image look like this.

Step 59 : Click on Layer 1 copy. Press SHIFT and click on Layer 1. Both layers are highlighted. Press CTRL+E.

Step 60 : The two layers are merged into Layer 1 copy. Press CTRL+J. A new Layer 1 copy 2 forms.

Step 61 : Press CTRL+T. A selection forms. Right click inside the selection. Click on Flip Vertical from popup.

Step 62 : The image looks like this. Press ENTER.

Step 63 : Drag Layer 1 copy 2 under Layer 1 copy.

Step 64 : The image looks like this. Layer 1 copy 2 has been dragged below Layer 1 copy.

Step 65 : Click on the Rectangular Marquee Tool.

Step 66 : Drag a selection at the bottom of the image.

Step 67 : Click the Layer Mask button. A Layer Mask forms on Layer 1 copy 2.

Step 68 : Press x and then d on the keyboard to restore the default.

Step 69 : Press g on the keyboard (Gradient Tool) and click on the Foreground to Transparent Gradient in the Gradient Editor at the top.

Step 70 : Press SHIFT and you can drag up in a straight line. Drag till the middle.

Step 71 : Lower the Opacity of the layer to 90%.

Step 72 : Drag the Opacity of Layer 3 copy to 100%. This is the layer which contains the dots at the top.

Step 73 : Change the Blend Mode of Layer 3 to Vivid Light and increase the Opacity to 100%. This is the layer with the dots at the bottom.

Step 74 : Lower the Opacity of Layer 1 copy to 70%. This the layer containing the image of the model.

The finished image. Other Photoshop tutorials are here


