


This is another Text tutorial on creating a poster in Photoshop. Some textures will be required. You can download and use free Textures from http://www.deviantart.com/
I will be using Textures from the same place.
You can also download free fonts from http://www.dafont.com/
Photoshop provides quite a large number of Fonts with each version. You can also download additional free fonts.
 This is the poster I will be creating.

Step 1 : I am using a large document as you can see, but still it is not large enough for a poster. If you want to make an actual one make sure that the Width and Height are more.

The Foreground/Background should be set to the default Black/White. If it is not press x and d on the keyboard to restore the default.

Step 2 : Press ALT+BACKSPACE to fill with the Foreground Color which is Black.

Step 3 : You can see where you can select the Fonts, set the Size, the Margin and the Text color. I have chosen Impact for the Font. It is available in all versions of Photoshop.

Step 4 : Set the Font Color by clicking in the top panel.

Step 5 : The Select Text Color dialogue box opens. Type in ffffff (stands for White). Click OK.

Step 6 : Draw out the Text Box.

Step 7 : I have set the Font Size at 65.

The Text looks like this.

You will have to click the Tick Mark in the top panel to commit the Text.

Step 8 : I will be using this free stone texture. You will find it here
It belongs to Cat-in-the-Stock

Step 9 : Press v (shortcut for Move Tool). Drag the Texture on to the Text.

Step 10 : The Texture is larger than my Text. Press CTRL+T. A selection forms. Press SHIFT+ALT and drag any of the corner handles inwards.

I have resized the Text.

Step 11 : I have moved it over the Text. Position it suitably by moving the Texture up or down.
Press ENTER.

Step 12 : Now to clip the two layers. To do this press ALT and click just between Layer1 and the Text Layer. You will see a small black circle momentarily as the layers are clipped.

The Text looks like this after clipping.

You will notice a small bent arrow pointing downwards from the Layer 1 thumbnail. It means it has been clipped with the layer below.

Step 13 : Click the Type Tool again.

Step 14 : I have now selected Arial Rounded MT Bold. You can use whichever Text you want.

Step 15 : I have typed in my second bit of Text. After typing in the Text press CTRL+T. Resize by dragging the Text to the right to make it seem broader. Click the Tick mark in the top panel to commit the Text.

Step 16 : I will now use this free Wood Texture. You will find it here
It belongs to shadowh3

Step 17 : Press v and drag the Texture onto the Text.
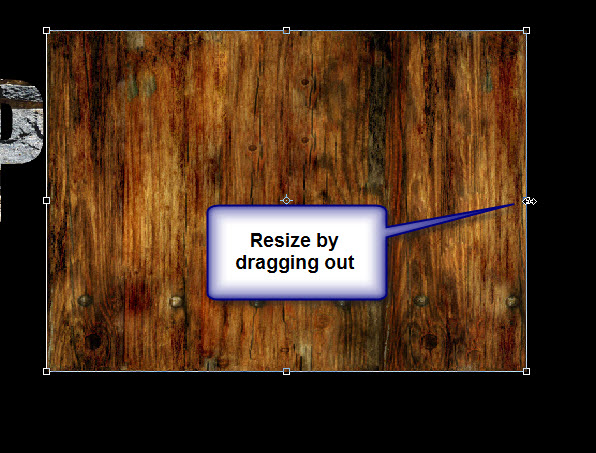
Step 18 : Press CTRL+T. Drag the middle right corner handle out to position it suitably over the Text it will be clipped with. Press ENTER.

Step 19 : Again press ALT and click between Layer 2 and the Text layer beneath it to clip the layers.

Layer 2 has been clipped with the Layer below.

Step 20 : I am reducing the Opacity of Layer 2 to 70%.

The Text looks like this so far.

Step 21 : Click the Text Tool. I am again choosing Impact as my Font.

Step 22 : I am setting the Font Size at 75.

Step 23 : I have typed out my Text.

Step 24 : I will now use this free Watercolor Texture. You will find it here
It belongs to Enchantedgal-Stock

Step 25 : Just as earlier press v and drag the Texture onto the Text. Position it over the Text.

Step 26 : Resize the Texture. Press Enter.

Step 27 : Just as earlier, clip Layer 3 with the Text layer beneath.

The poster looks like this so far.

Step 28 : I have typed in my next bit of Text. I am have used Impact as the Font.

Step 29 : I will now use this free Gold Texture. You will find it here
It belongs to Enchantedgal-Stock

Step 30 : Just as earlier. Drag the Texture onto the Text. Resize it. Press ENTER to commit the resizing. Clip it with the Text Layer below.

You can see that the Gold texture has been clipped with the Text layer below.

Step 31 : I have typed in my Text again. I am still using Impact as the Font.

Step 32 : I will be using this free paper texture. You will find it here
It belongs to chokingonstatic

Step 33 : Drag the Texture to the Text. resize it. Clip the Texture with the Text.

The text looks like this.

Layer 5 containing the paper texture has been clipped with the Text layer below.

Step 34 : I am using BestMarker as the font. You will find it at http://www.dafont.com/bestmarker.font

Step 35 : I have typed in my next bit of Text. The word is Dreams actually. I will add the D later.

Step 36 : I will now use this Gold Texture. You will find it here
It belongs to Henker144

Step 37 : Drag the Texture over the Text. resize it. Clip the layer with the Text Layer below it.

The Texture has been clipped to the Text.

You can see Layer 6 containing the Texture has been clipped with the Text layer below.

Step 38 : I have now selected the Latha Font.
You will find it here

Step 39 : I have set the Font Size at 90.

Step 40 : I have resized the Font drawing it over the underlying letters. .

Step 41 : Download this free silver fabric texture. You will find it here
It belongs to photomars-stock

Step 42 : Resize the Texture over the letter D.

Step 43 : Clip the Texture with the Text layer below it.

Step 44 : The image looks like this.

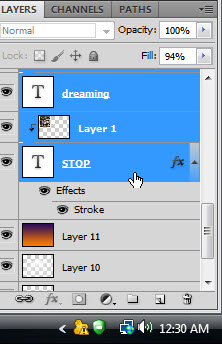
Step 45 : Click on the first Text layer which contains the Text STOP. Click on the Layer Styles and click on Stroke.

Step 46 : The Stroke dialogue box opens. The default color of the Stroke is Red or Black depending on the version of Photoshop. Clicking the Color brings up the Select Text Color. Type in ffffff at the highlighted box at the bottom. It stands for White. Click OK in Select Text Color.

Step 47 : I have increased the Stroke size to 5 and changed the Position to Inside. Click OK.

The image looks like this.

Step 48 : Click again on the topmost layer.

Step 49 : Click on the Custom Shape Tool.

Step 50 : Click Shape to reveal the dropdown menu. Click on the small arrow at right. You will find additional Shapes. Click on Arrows.

Step 51 : This dialogue box open. Click OK.

Step 52 : In the Arrow Shapes click on the one the small hand points to.

Step 53 : Click on the Foreground Color. The Color Picker opens. Type in f28816 in the highlighted box. It is a shade of Orange. Click OK in Color Picker.

The Foreground Color changes to the color picked.

Step 54 : Click Arrow 18.

Step 55 : I have dragged out the Arrow shape.


Step 87 : Press SHIFT and click on the last Text layer.


