


I am posting this as a special effects poster tutorial, but it is actually to explain the Quick Selection Tool Refine Edge and Refine Mask in Photoshop CS5. I will walk you through each of these tools that CS5 has come out with.

This is the poster I will make.

I will be using this free stock image. You will find it here
It belongs to

Step 1 : Click the Quick selection Tool.


Step 2 : In the top panel there are three icons as you can see which are for making a new selection, adding to a selection and subtracting from a selection.

Step 3 : Beside the three ways of making a selection, the Quick Selection Tool acts just like a Brush. You can set the Size, Hardness and Spacing. The Size is important. You can start out with the default setting of 13 for the Brush size. Decrease the size to select small details. Increase it again for selecting large details. Leave the Hardness at 100. The Spacing too should be left to the default value.
About Pen Pressure you need not bother unless you are using a Pen Tablet.

Step 4 : Click on Add to selection to begin.

Step 5 : Drag from the top of the image. A selection forms as you drag.

Step 6 : I have dragged over the background. Almost the entire background has been selected.

Step 7 : Press CTRL+SHIFT+I to Inverse the selection.

Step 8 : Zoom into the image.

Step 9 : I am adding to the selection in the hair. But some background has also been selected.

Step 10 : Press ALT and click with the Quick Selection Tool. You will find a minus mark in the cursor. This subtracts from the selection. The top part of the hair is now correctly selected.

Step 11 : I am decreasing the Hardness to 50%.

Step 12 : Let go of the ALT. The cursor has a plus sign since we selected Add to selection in Step 4. I have selected the wisps of hair.

Step 13 : I have pressed ALT again. The cursor shows a minus sign. I have selected the portion inside the hair. This is how you do it. Set Add to selection at the outset and begin the selection, lower the Hardness and press ALT where you have to subtract from the selection. As soon as you release ALT, the cursor goes back to the Add to selection mode. Decrease the size of the Brush for small details.

Step 14 : I have selected the portions between the hair. You can see how perfectly this tool works.

Step 15 : I have pressed ALT and selected the portion between the legs.

Step 16 : Go over the selection in the zoomed out state to check if you have missed bits and pieces here and there then zoom out.

Step 17 : Next Zoom in should be selected in the top panel before proceeding with the next step.

Step 18 : Go to Select>Refine Edge.

Step 19 : The Refine Edge dialogue box opens.

Step 20 : The first step is how you wish to view your selection. If you click on View you will get a number of options. I have chosen On Layers.

Step 21 : The Refine Edge has a Zoom Tool. Click it.

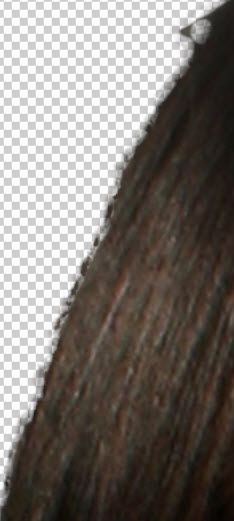
Step 22 : Zoom into the image. Even though this is a small image you can see that the selection edges are rough.

This is a closeup view of the edge of the hair. You can see that it is very uneven.

Step 23 : Check the Smart Radius and drag the Radius slider to the right slowly and keep a watch on the edge. There is no hard and fast rule about how much you drag the slider. It will depend on the resolution of your image. This is a high resolution image.
This is how the edge looks now.

Step 24 : Next drag the Smooth slider keeping an eye on the edge.

This is how the edge looks now. The edge has been smoothed out. The jagged edges have gone. But some of the details may have blurred. Let us correct that.

Step 25 : Now drag the Contrast slider to get some of the details back. The Smooth and Contrast sliders work hand in hand. If you feel you have smoothed out too much of the details of the edge, use the Contrast slider to bring some of it back.

Step 26 : I have now lowered the values for smart Radius, Smooth and Contrast. I have dragged the Feather slightly. There is no magic figure for these values. It will all depend on your image and you.

This is how the edge looks now.

Step 27 : Next check the decontaminate Colors. This is to do away with remnants of the background color at the edges. Drag the Amount slider suitably, keeping a watch on the edge.

Step 28 : The last setting is Output To. You can choose New Layer or New Document. I have selected New Layer with Layer Mask. There is a definite advantage in this. Next Click OK in the Refine Edge.

This is how the edge looks.

This is how the image looks.

Step 29 : This is how the Layers palette looks like. Click the Mask.

Step 30 : Now click on Mask Edge.

Step 31 : You now get the Refine Mask. It has the same settings as the Refine Edge. This is to fine tune the edges.

Step 32 : Use the Zoom Tool to zoom in.

Step 33 : Click the Brush Tool.

Step 34 : Click again and you will get two other options.

Step 35 : Paint with the Brush at the edge.

The Brush gets some of the fine details of the edge back.

I have got the edges of the hair back.

Step 36 : Check the Smart Radius and drag the slider.

This is how the edge looks.

Step 37 : Now drag the Smooth slider first and then the Contrast slider. If you feel you have obliterated too much, use the Contrast slider to correct it.

Step 38 : Now drag the Feather slider to soften the edge if necessary.

The edge looks like this.

Step 39 : Use the Shift Edge slider to make the selection more accurate by dragging to the left or right.
Do it slowly.

Step 40 : Now Check the Decontaminate Color and drag the slider suitably.

The selection looks like this.

Step 41 : Lastly in Output To click on New Layer with Mask. Click OK.

You will see this dialogue when you exit the Refine Mask.

The Layers palette looks like this.

The image looks like this. Now to make this into a poster.

Step 42 : CTRL+CLICK on the New layer icon. A new Layer 1 forms under Background copy layer.

Step 43 : The Foreground Color should be set to Black.

Step 44 : Press ALT+BACKSPACE to fill the layer with Black.

The image looks like this.

Step 45 : Click on the background copy layer.

Step 46 : Press CTRL+T. A selection forms.

Step 47 : Press SHIFT+ALT, grab a corner handle and drag down diagonally to resize.

Step 48 : Hover the cursor near a corner. A bent two headed arrow appears. Rotate the selection with it. Press ENTER when you're done.

Step 49 : Click the New Layer icon. A new Layer 2 forms above the Background copy layer.

Step 50 : Switch the Foreground Color to White by pressing x on the keyboard.

Step 51 : Click the Brush Tool.

Step 52 : In the Brush controls at the top, I have set a Size of 14 pixel and Hardness to 100%.

Step 53 : I have clicked on the toe of the shoe with the Brush, pressed SHIFT and drawn straight up. Keeping SHIFT pressed ensures that the line is straight.

Step 54 : I have clicked again on the finger, pressed SHIFT and drawn straight up with the Brush.

I have drawn similar lines with the Brush.

Step 55 : I have increased the size of the Brush to 60 and reduced the Hardness to 24%.

Step 56 : Click once at the beginning of the line.

I have done likewise with the other lines.

Step 57 : Press CTRL+CLICK the new layer icon. A new Layer 3 forms below Layer 2.

Step 58 : The Foreground Color is set to White and background to White.

Step 59 : Click the Gradient Tool.

Step 60 : Click where the red arrow points to reveal the Presets. Click on the first one -- Foreground to Background. Next click on the Radial Gradient icon.

Step 61 : Drag up diagonally with the Gradient Tool.

Step 62 : The image looks like this. Press CTRL+T. A selection forms.

Step 63 : Press SHIFT+ALT and drag down.

Step 64 : Press v for the Move Tool and position the selection at the bottom of the image. Press ENTER.

Step 65 : Drag Layer 3 below the Background copy layer.

Layer 3 has been dragged under Background copy layer.

Step 66 : Reduce the Opacity of Layer 3 to 80%.

This is how the image looks. You can add some Text.

The finished poster.
Other photoshop Tutorials are here


